Painting 1 (UPM); Part 4; Initial research into the tondo

WHAT?

Historically, this seems to be a format which has been traditionally applied to landscapes, classical and religious scenes and portraiture.

A couple of my favourites which are a little different but seem well suited, almost enclosed and held, enfolded, by the tondo format are:

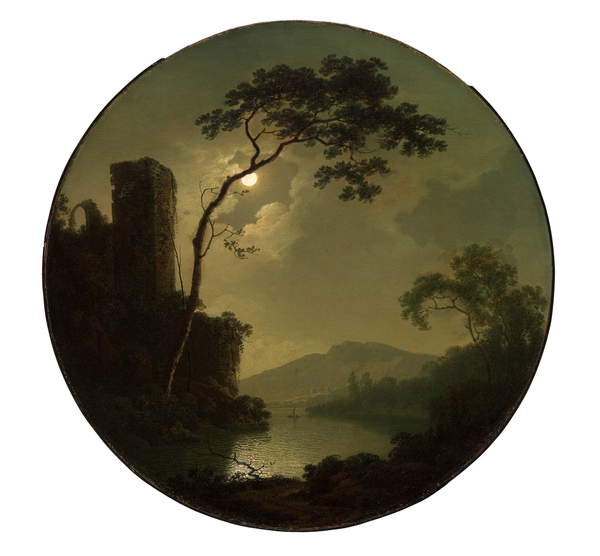
Wright of Derby, Joseph

“Lake with Castle on a Hill”

1781

Oil on canvas

Saint Louis Art Museum, Missouri, USA

Brueghel, Pieter the Younger

“If the Blind Lead the Blind, Both shall Fall into the Ditch”

c. 1594

Oil on panel

Koninklijk Museum voor Schone Kunsten, Antwerp, Belgium

Some contemporary artists have also embraced the form as offering possibilities for something with  dynamic composition, for example:

Bolotowsky, Ilya

“Yellow Tondo, Variation 1”

1968

Acrylic on wood

Mead Art Museum, Amherst College, MA, USA

I started to focus my search on tondos of interior scenes; these were harder to spot but were there, for example:

Herring Snr, John Frederick

“Nanny”

1848

Oil on canvas

Blackburn Museum and Art Gallery, UK

Everything here is slightly off-centre; I thought the steps might lead your eye out of the picture, but actually they just take you round in a clockwise direction, checking off the various elements which surround the nanny.
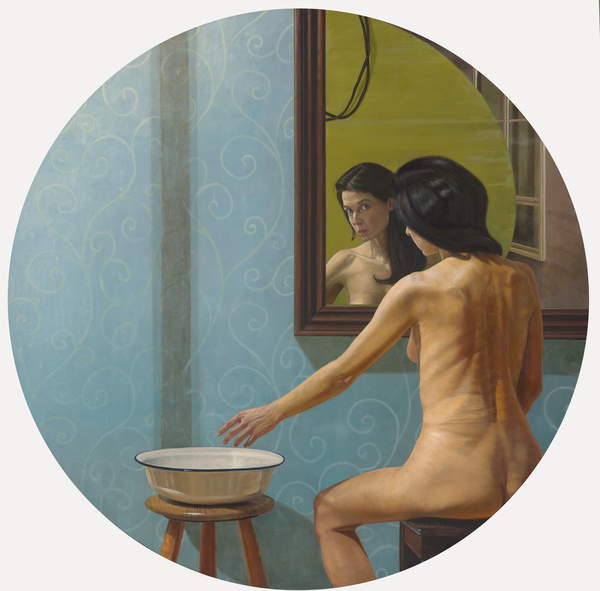
Kalaizis, Aris

Psemata I”

2006

Oil on wood

Bridgeman Images

This again had quite a rotating composition – start at the lady’s shoulder, down either her back/leg or her arm to the bowl, up the dark line to the mirror and reflection, and so on.

Alice Mumford of St Ives School of Painting has done a couple of webinars recently on composition (see separate blog posts) and she featured Giorgio Morandi in one, so I was interested to find this work of his in tondo format:

“Still Life”

1952

Oil on canvas

Bridgeman Images

I find this a slightly odd image; the surface on which the pots sit has no visible means of

support that we can see, and the jar at the front right-hand end is right on the edge, presumably by design, and I can’t help feeling anxious that the whole lot is going to come crashing down when knocked by a clumsy passer-by (such as myself). Hmmm…

SO WHAT?

I decided to take the Morandi tondo as a basis, intending to:

  • Get back into painting after all that printing in Part 3
  • Experience painting in a circular format
  • Try to understand this composition a bit better

Working in an A3 pad of mixed media paper, which has a surface somewhat like a NOT watercolour paper, I drew some circles on a page. Next came a small pencil drawing to get a feeling for the placement of the objects in space. Morandi did in fact make this an easy image to replicate – the horizontal diameter pretty well lines up with the horizon (in this case, the back of the surface) and the vertical diameter goes through the blue vase – making this a really easy place to start each time. He has also lined up the left-hand sides of the left-hand pot and jar, so that was very easy too. 

I marked in the dark tones and then started off with egg tempera, using titanium white, Naples yellow, Van Dyck brown and ultramarine blue, working with sable brushes, mid- and fine. I had been suffering a bit with my back so had set up my working position seated, with the pad facing me almost vertical on an easel, and worked with my left hand; a little while since I’d done that, so the control took time to come back – but it allowed looser strokes than I might have been tempted to start with otherwise. I worked from my sketch and a photo of Morandi’s painting.

It was a little clunky and more coloured than Morandi’s very chalky pastel colours, but I was glad to get back into the swing.

Next, I had a go at using enamel paints. I painted standing with the pad lying flat on a dresser. I used quite a bit of Zest-it solvent where I wanted the paint fairly thin. I tried first wetting the paper where I was working and then adding the paint; this didn’t go so well because the absorbency of the paper “caught” at the paint, even though soaked in solvent, and it was hard to move around. I then tried wetting the brush with solvent and picking up a bit of paint to apply, and this worked much better.

The colours are difficult to identify because they’re not named on most of the tins I had – but it was a light and dark blue, an ochre-y and a sienna-y brown, and gloss white. I worked from my sketch and my egg tempera painting, not looking at Morandi’s original.

Next I turned to inks, which I haven’t used for ages. I had three acrylic inks – indigo, sepia and brilliant yellow – and some burnt sienna Indian ink, again working with thin and mid sable brushes.

Again, I worked from my sketch and my two previous paintings without referring to Morandi’s original. It’s interesting that the style seems to have become less like Morandi and more like Cezanne as I’ve gone along!

NOW WHAT?

  • The “Chinese whispers” effect (working from the previous painting and not the original) has been interesting to look back on, as I wasn’t aware of it as I was painting – I have gradually lost the wonky profile of the top three vases, which I think gave Morandi’s original some of its dynamic tension; on the other hand, I have moved to a fairly dominant blue/orange colour scheme which I personally like.
  • I enjoyed the experience of painting into circles; the shape automatically brings a feeling of movement with it, and solves the question of what to put in the corners. Possibly the challenge is then to compose your painting in a way that utilises this property, rather than putting a brake on it.

St. Ives School of Painting – 28.1.21 – “Understanding Composition – Top Trumps” with Alice Mumford

WHAT?

This was a one-hour webinar, a continuation of last week’s session on composition. Alice said that, if you thought about trump cards in a card game, they outshine everything else in the game, and that artists have techniques which they use in a similar way to make you look at what they actually want you to see.

SO WHAT?

Lighting: as an example she discussed Rembrandt’s “The Night Watch”, 1642, Rijksmuseum (which I am lucky enough to have seen, amazing). Apparently Rembrandt was commissioned to paint this group of people so he set them as a scene like this; the most important chap is front central, and your eye goes to him first because it looks for the point of highest contrast, which is his white ruff against the black clothing, and the eye is then led around the painting in order of decreasing contrast.

Line:  here we looked at Tintoretto’s “The Miracle of the Slave”, 1548, and traced our way around the painting in a rough figure of eight, starting with St. Mark coming straight down in the centre and a line leading more or less directly down to the other key figure in this busy painting, the slave lying on the ground.

As a combination of lighting and line we looked at Caravaggio’s “The Calling of St. Matthew”, 1599-1600 which, as you would expect, has some dramatic shafts of light against a chiaroscuro background causing some strong contrasts which help the eye move around. Also it is not immediately apparent which character is St. Matthew – until Alice pointed out a set of hands, virtually in a line, all pointing to the end figure!

Hats and eyes:  here we looked at a couple of paintings by Renoir, “Luncheon of the Boating Party”, 1882 and “Dance at Moulin de la Galette”, 1876. The “entry” point into both of these appears to be a character, or pair of characters, who are mid-ground and slightly in their own space, looking out towards the foreground, almost out of the painting. The way round the painting is then to follow their eyes, see whom they are looking at, where they are looking, and so on. One is also led to follow sets of matching hats around the picture; in the first of the above they all seem to be a matching bright yellowy/orange with blue ribbons which stand out and are really distinctive. In the second there is also the use of pairs following the colour pink (as discussed in the previous session).

The Golden Section: I hadn’t got to grips with this before and it might take a bit of practice!! To find the spot, fold one corner of a rectangle up to the edge and draw a line down to show the square; then fold the opposite top coroner down to the line to make another square – this leaves a rectangle. The two squares are static and the rectangle dynamic (see last session) and the point where they meet is the golden section, and this is where you want to place your key thing which leads the viewer in. Alice discussed this looking at David Hockney’s “Mr and Mrs Clark and Percy”, 1970-1, and Matisse’s “The Conversation”, 1908-12. Also, most of Ben Nicholson’s works use the golden section.

High Contrast: as well as being drawn to the point of highest contrast between light and dark, the eye will be attracted to contrasts in colour, which she illustrated by comparing and contrasting Ben Nicholson’s 1924 picture “First Abstract Painting, Chelsea”, c 1923-4, with Matisse’s “The Snail”, 1953.

NOW WHAT?

A lot to take in – was pleased I had remembered some of the points from last week (e.g. pairs) and could “see” them as Alice talked about them.

My takeaways from this session are going to be:

  • Think about that “high contrast of light and dark” point when I am building a composition of interiors in Part 4
  • Look at some paintings and try to spot the golden section.

Painting 1 (UPM); Part 3: Looking back at the assessment criteria (and forward to Part 5)

REVIEW OF PART 3

Demonstration of visual skills: Materials, techniques, observational skills, visual awareness, design and compositional skills:

I have done quite a bit of drawing, both whole body and portraiture (particularly the latter) in this section of work. I have mainly worked with a sharpened 2B pencil and putty rubber in sketch books, and have tried to improve my understanding of the use of blocks of tone and shape.

It was helpful to have a demonstration of the process of printing with oil paint in the course material as a lot of the instruction I found online or in books relates to a similar- yet-different process of rolling out printers’ ink and drawing into it. Learning was therefore a matter of trial and error, mixed with a bit of frustration, but I gradually began to appreciate the versatility of printing in this way, and the range of possibilities for developing the work. I eventually worked my way towards a method of combining two separate prints into one picture in a meaningful composition.

Quality of outcome: Content, application of knowledge, presentation of work in a coherent manner, discernment, conceptualisation of thoughts, communication of ideas:

I loved the free gloopiness of the oil paint on the glass, but my initial experiments in adding paint to the print on paper resulted in images that were very clunky and solid. I found these unsatisfactory as, to me, the whole virtue of making a monoprint using oil paint in this way was the fact that the marks often were incomplete and the image rather fugitive, and I wanted to find a way of working that used these qualities, rather than just filling and blocking everything in which then made it more into something you could just have painted without the printing stage. The transparency of the print felt very suited to portraiture as a way of capturing mind rather than body, a quality I think Annie Kevans achieves in her paintings. 

Demonstration of creativity: Imagination, experimentation, invention, development of a personal voice:

Before undertaking this review I collected all my prints together, put them in chronological order, and arranged them in an A3 folder. My final assignment pieces, when I had got to that stage, seemed to have materialised from nowhere – but going back to the start revealed a very clear path of trial, likes and dislikes, experimentation and development as I looked at different artists’ work and tried to incorporate bits of what they had done into my own process; I hope this is reflected in my learning log.

Context: Reflection, research, critical thinking (learning logs and essay):

A number of artists set me thinking and working in particular ways. Looking at Maggi Hambling’s monotypes, which were just a few strokes in a void and yet were enough to depict a recognisable person, started me off thinking about painting a person “in essence”. Paul Wright’s gestural marks offered me a way to think about doing that. Marlene Dumas’ and Annie Kevans’ paintings both made me consider what you have to include and what can be safely excluded to make a clear portrait which also had an “otherness” to it. And Milton Avery’s penchant for making simple, calm prints in pleasing colour combinations really crystallised what I hoped to achieve by the time I reached my Assignment pieces. The current situation, living in a Covid lockdown, with so many people feeling that their mental health is deteriorating, made me think about minds in general, and how they often aren’t doing what we mean them to. I hope my Assignment work is a culmination of all that…..with a hint of a way to develop the process further in the future.

LOOKING FORWARD TO PART 5

This is not a decision set in stone;  I am interested to see what Part 4 will have to offer, as I suspect that this might change my mind. However, I really enjoyed working in egg tempera back in Part 1 and should like to experiment with this further. I recently read an article about the work of Mary Anne Aytoun Ellis who paints in egg tempera, although in a very different way from the “classic” method, so I would choose her as a current artist. For an historic artist I might look at Leonora Carrington, who was very attracted to the medium, although I know she didn’t use it all the time. Another possibility is Piero della Francesca – we always have to go and look at his 1442 “The Baptism of Christ” whenever we go to the National Gallery, it is my husband’s all-time favourite painting.

As a backup alternative there would always be painting in enamels (a medium I also really enjoyed in Part 1), with Raqib Shaw as my current artist and Jackson Pollock as my historic artist.

Painting 1 (UPM); Part 3; Assignment


WHAT?

As I have worked through this section, I have been particularly influenced by the work of various artists, in particular Marlene Dumas, Paul Wright, Maggi Hambling, Annie Kevans and Milton Avery (see earlier blog posts). As a result, I have developed a method of monoprinting which:

  • Is ethereal in the sense that sections of the print fade at the edges and I have only chosen to paint into certain defined areas
  • Is calm and meditative
  • Has colours which are “harmonious” (see blog post on Milton Avery)
  • Picks out key areas of the face to make a clear and believable portrait (especially eyes, mouth, and bone structure)

I did acquire the suggested additional reading, “Reappraising Drawing Past and Present, by Michael Craig Martin (1995, London: Hayward Gallery)”; I read the essay at the beginning of this section and was frankly a bit mystified as to why we were being asked to look at it at this point. However, I now totally get it – it is the characteristic features of monoprinting in oil which have allowed me to develop this style, where it is OK to have parts which look hazy and underprinted.

I have also been working on building my confidence with portraiture, using the resources available from Raw Umber Studios, and have been making portrait and full body drawings in 2B pencil, worked into with a putty rubber. I decided to use some of these portraits as my “base” images for the printing, rather than borrowing images from books or magazines, so that the work is completely my own.

I had also wandered into a method of printing a face in two halves. I found it fun and wanted to continue with it, but took time out to think what the point of these images was. I try to keep COVID stress out of my work, as my art is my refuge from COVID, but I have heard and read from so many people that they find it difficult at the moment to concentrate on tasks and their mind is all over the place, that I think my images might convey a sense of this “wandering mind”. Also to me, who is a bit of a daydreamer at the best of times, the images feel as if they depict one half of me trying to focus on something, while the other half of my brain has drifted off out of the window into the wide blue yonder. I was going to entitle my assignment pieces “Daydreaming” – but my husband very wisely said that it would be better to leave the viewer to put their own interpretation on the pictures, and on reflection I think he is perfectly right.

SO WHAT?

After experimenting with supports and backgrounds (see earlier blog posts) I decided to work on HP watercolour paper. I wanted some colour in my background (to represent my “wide blue yonder”), but experience had taught me that this shouldn’t be so busy that it distracts from the print. Hence I covered some sheets with watercolour washes:

  • Cerulean blue with streaks of Prussian blue
  • Mix of cerulean and Prussian blues with some areas of perylene maroon
  • Indian yellow with streaks of burnt sienna

I prepared three A3 sheets and then cut them in half, so each print is just under A4 (taking into account the edge strips where I had attached the paper to the board for stretching).

Image 1


This was printed onto the blue/maroon mixture, and I chose crimson as the printing colour, with the jewelry picked out in cerulean and white once the print had been made. I used a feather to drag the shadow over the face whilst still on the plate, and drew in some of the fine lines on the plate for the hair.

Image 2

This was printed on the yellow/sienna paper. I wanted a strong deep orange to print with, which I mixed from yellow ochre and cadmium red with a touch of white. I made the texture of the hair with a cotton bud before printing, then worked into the eyes and mouth on the paper to define them.

Image 3

This was printed onto the cerulean blue; this is quite a green-ish blue and I was looking for colours to harmonise, so I chose emerald green with just a dash of white for the print. Again, I added texture to the hair with a bud whilst still on the plate. To further define the image once printed, I worked into the eyes and mouth, and just defined the shape of the strong shadow on the “hand” side.

Image 4

This was printed on the yellow/sienna paper. I thought I would experiment with a complementary colour for the print, so mixed up a purple using cerulean blue and cadmium red with a touch of white. Once printed, I worked into the eyes and mouth. My glass plate has tape around the edges and I found the paint was getting trapped along one edge in particular and was showing up on the print, so had to give this a good clean before moving onto the next print.

Image 5

This one turned out rather differently. It was printed onto the blue/maroon, and I had quite liked the way Image 4 with its complementary colours turned out, so tried printing this one using lemon yellow. I had also been trying to vary the position of the split between the two images and, as they had all been a fairly wide split so far, I thought I’d try something a bit closer, but just one higher and one lower. Two things happened – first, the yellow didn’t show up as strongly as I had hoped in the print so I had to paint into the eyes and those really strong contour lines of the face with thick yellow and also some white to make them stand out, and it makes for a rather ghostly effect . Also, the second print ended up very close to the first, just slightly higher, so the face is misaligned rather than completely split apart, and I suspect the viewer will have to look quite hard to work out what’s going on.

Image 6

This picture was printed on the cerulean blue paper (which looks a little washed out in this photo but is the same blue as Image 3 above). I thought this time I would try a dark blue on light blue, so I picked ultramarine violet for the printing paint. Once printed, I painted into the mouth and also the eyes, particularly clarifying those amazingly arched eyebrows.

Now I had six monoprints,  from which I needed to make a selection of three. I was pleased with the way all of them had come out for differing reasons and so, finding the choice difficult, asked my husband, two adult children and granddaughter (11) for their favourite three. Interestingly, they all chose two the same (Image 1 and Image 6), with one vote each for the other four. So near and yet so far…

I had looked at the ways the artists suggested in the course text laid out their exhibition of collections of portraits. Luc Tuymans, Annie Kevans and Chantal Joffe have all gone for simple side-by-side arrangements on occasion, with either simple black or white frames or, in the case of CJ, no frame at all. If I were exhibiting these six prints I would arrange them lined up sequentially in the same way, probably each in matching white mount and very simple and minimal black frame. To get a bit of an idea of how this would look, I laid my prints out on a white sheet in groups of three to see if this helped me with my selection.

In order to present a representative sample of my work as my final submission for this Assignment, I have gone for this combination:

This was on the basis that it shows an example of each background and varied directions of split (vertical, horizontal and diagonal).

NOW WHAT?

  • I feel that my portrait drawing has improved as I have progressed through this section – I am growing in confidence in drawing shapes and tones rather than “an eye” or “a nose” – but need to continue with regular practice to maintain and develop this skill. I remember, back in the day when we could go to live demonstrations, a portrait artist telling us that, to be any good, one needs to aim to do “a head a day”….so, a way to go yet.
  • I have developed my own style of printing throughout this Part which I hope people will find interesting to look at. I think they fulfil my starting criteria of being:
    • Ethereal and meditative
    • Calm and harmonious, in that the relative colours of background and print are not “startling”
    • Working as accurate portraits even without every little detail
    • Arising from the characteristics of oil monotypes
  • I very very nearly chose the “ghostly man”, Image 5, as my third picture in my final choice because he was unusual. I think that, if I were to develop this method of working further, this closely-printed pair of prints, resulting in a slightly distorted portrait which would present the viewer with a different type of puzzle to decode, would be the way to go. To do this with any accuracy would mean I would need to devise a more accurate method of knowing exactly where to place the paper onto the printing plate.

St. Ives School of Painting webinar – “Understanding Composition – Static and Movement” with Alice Mumford, 21.1.21

WHAT?

This was a one-hour session where Alice set out some principles of composition, using and comparing a variety of works from an Egyptian statue right through to the present day.

SO WHAT?

  • Wherever your eye is drawn to first is where you enter the painting
  • Egyptian statue was symmetrical, and was an example of “static” with its powerful solidity; contrast the Roman statue in a natural pose, which was all about movement. She gave an example of Morandi’s “Still Life”, 1946, which combines static and movement by having a central static pot and then a range of others behind which make your eye move around.
  • Left to right: she worked through a comparison with works by Chardin and Klee, with their underlying structures akin to musical staves, which encourage the viewer to “read” the image from left to right as if it were music; contrast William Scott’s “White and Black Pot on a White Table”, 1955, where the big white pot bang in the middle dominates the picture – beware of the “ego in the room”!
  • Bottom to top: we looked at some Matisse examples – he went for a portrait layout, often with a “welcome mat” in the foreground at the bottom which drew your eye into the picture and then echoing shapes and colours of objects carry you up through the painting.
  • Repetition and narrative: your eye will pair up colours and shapes to create movement and reinforce a narrative – examples were Tom Roberts’ “Shearing of the Rams”, 1890, and also Brueghel’s “Hunters in the Snow”, which creates a warp and a weft (this can slow your eye down with its complexity – Alice suggested going to look at Bonnard and Vuillard who do something similar).
  • Zig-zag: examples of this were Claude Lorrain’s “Flight into Egypt”, 1666, and Turner’s “Caligula’s Palace”, 1831 – the proscenium arch effect, where you are led in a zig-zag from the foreground through to the background.

NOW WHAT?

I’d come across the “zig-zag” composition idea before but hadn’t worked through the others before; I’m going to:

  • Look through some art books and try to identify examples of each
  • I’m particularly drawn to the “repetition and narrative” pairing idea so I’d like to hold this in my head and try to actively use it

Painting 1 (UPM); Part 3; Investigations into supports

WHAT?

Having lit on the idea of having “floating” heads, or parts of heads, on a background which might be blank or coloured or patterned, I need to look at the right support for this. I have tried marbled paper, which does not hold the paint terribly well. I have hitherto mainly worked on plain basic sketchbook-weight cartridge paper which has taken prints well, but I don’t feel it will be robust enough to take a background and then a print on top; hence the need for an investigation into alternative supports.

SO WHAT?

I took another felt-tip pen sketch from Drawing 1 as my “base” drawing – this again is too large for my glass printing plate so I have to select part of the image to work with in each print.

First up was some thicker cream-coloured cartridge loose paper. I laid down a thin watercolour wash, rough sky-and-cloud images, as background to test the uptake of oil paint over the watercolour. Then I mentally divided the base image into three parts and made three prints onto my test sheet. Each time I tidied the image on the glass with my cotton bud (having done all the painting onto the glass with a rigger), printed it, and then painted into the print on the paper, adding definition to eyes, sometimes nose, and mouth.

I found the oil paint sometimes skidded slightly on the places where the watercolour was thicker, but generally the print “took” well.

The trickiest part was working out where on the page to place it down on the glass, and I found that the easiest way was to work it out by looking through the glass from the back.

Next up was some thick paper, almost card, which I had bought in Part 2 under the guise of a vegan leather substitute (I had been thinking of trying to paint on leather).

This is a mid-tone tan colour, so this time I tried taking the blank paper as my mid-tone and just making the print with some darker brown (made by mixing crimson and emerald green) for key dark tones, and white for a few important light tones.

The paper took the print very accurately and I rather liked this dark-mid-light tone clarity. Again, I worked into the eye a little to make this a focal point.

My third support to try was HP watercolour paper. I stretched an A3 sheet and then gave it a light mid-tone background, aiming for somewhere between the slightly busy sky of my first experiment and the plain brown of my second; so I gave it several coats of a dilute watercolour wash of raw sienna and a dash of warm sepia, applied with a fan brush, and enlivened with a few horizontal streaks of perylene maroon into the wet washes. I wanted to pick a “harmonious” oil colour for the print and decided on cerulean blue, with some white highlights and pink (crimson/white) shading.

For my reference images I also chose a different couple of sketches from Drawing 1 by way of variety.

I repeated my design of split, separated halves of each face. I started with my very old lady. Each time I went through my process of painting onto the glass, tidying any wayward or over-thick marks which might splodge with my cotton bud on the glass, printing the image and then working into it on paper with a rigger to add definition to specific parts, especially the eyes.

This paper seems to soak up the paint like a sponge in an instant, particularly where I had it diluted with quite a bit of solvent. Interestingly, the blue printed much better than the bits of white – almost none of the white seemed to transfer over, and I had to add it in on the paper. The fact that the paper was already covered by a layer of watercolour wash did not seem to affect its absorbency; something which I had found to be a bit of a limiting factor on the thick cartridge paper.

Next was my smiling lady – chose her because of the challenge of her glasses, her big hair, and her closed eyes. This time I only printed the blue, deciding to add the white direct onto the print on one side, and experimenting with a pinkish wash for shading on the other. The closed eyes made me look for other features to work into and define on the print – I tried to clarify what was glasses, shadow and nose around the eye area, and also made the structure of her collar stand out a little.

NOW WHAT?

  • I have happened on this method of working, printing only part of a face and then working into it, rather serendipitously, but I like it and want to pursue it as I move into my Assignment
  • HP watercolour paper with a watercolour wash is the way forward as a support for my prints

Painting 1 (UPM); Part 3; Research – Milton Avery

WHAT?

I became interested in Milton Avery’s monotypes as a result of finding this image on the front cover of a book from the Metropolitan Museum of Art (Milton Avery, “Myself in a Blue Beret”, 1950).

A biography on the Smithsonian American Art Museum site (www.americanart.si.edu) described his strength in life drawing and portraiture (as well as his friendship with Barnett Newman, whose work we saw at the Pallant House Gallery in Chichester last year – see separate blog post). It went on to explain how, after a heart attack which restricted his ability to work, he turned to monotypes which affected his painting style and caused him to eliminate extraneous detail from his work and he began focusing on the harmony of the overall picture. The article suggests that his poor health meant that “…the harmonious colours and perfect clam of his painting reflect his wish to eliminate everything in his art – as in his life – that was not absolutely necessary.”

SO WHAT?

I was attracted by the idea of simplicity (as in Annie Kevans work, see separate blog post) and calm, and also wanted to explore the “harmonious colour” side of Avery’s work.

I decided to try to print onto some of my “freestyle” marbling sheets (see earlier blog post) which were not too busy.

This was my marbled paper, and I decided to work from this quick sketch which I had done in felt pen back in Drawing 1. The sketch was quite big, too big for my glass plate, so I cut my marbled paper in half and printed half of the face on each piece:

I focused on main darks, major bone structures, eyes and mouth, and I painted into each eye and mouth to give them more definition. When I put them to dry, serendipitously side-by-side, it occurred to me that I could make an image of the whole face, but floatingly disjointed, one one sheet.

I therefore chose another of my more random marbled sheets, and another felt pen sketch from Drawing 1, to have a go at this.

I made the image in two halves as before, tidying them up before printing with the cotton bud on the glass, and then, once they were printed I painted into the eyes to give them more definition.

I really liked this effect, I find it makes one’s eyes move back and forth to match up parts of the face.

However, the marbling paper has had to be treated with alum as a mordant, and then has a layer of acrylic paint printed onto it to make the marbled effect, so the oil paint of the print image can slide about a bit (as seen in this close-up). It makes a sort of seaweed-y mark, which is interesting, but makes it difficult to get a clearly printed image.

NOW WHAT?

  • I really like this “floating head” idea, which fits with the ethereal quality I was attracted to in the work of Marlene Dumas and Annie Kevans, and I should like to explore it more
  • However, I am not sure that marbled paper is the right support as it does not absorb the oil paint well, so I am going to explore some other options.

Painting 1(UPM); Part 3; Exercise 4

WHAT?

I decided to build some of my research into this exercise. For each print from Ex 2 and 3 which I choose to paint into, I will try and work in the style of one of the artists whose work I have been studying.

SO WHAT?

Lord Alfred Douglas (Bosie) 2016 Marlene Dumas born 1953 Presented by an anonymous donor 2018 http://www.tate.org.uk/art/work/T14922

I began with the work of Marlene Dumas. Her paintings have a ghostly effect; one that I particularly liked was her 2016 oil painting, Lord Alfred Douglas (Bosie), which to me has caught the character of the man (that I’d formed an impression of from previous reading, at least) with some judicious use of dark and light and her pastel-y choice of colours along with black and white.

I chose to work into this print; it felt a little undefined but with clear lights and darks.

 I mixed the few colours I used with quite a bit of white to achieve that pastel-y effect, apart from the dark brown for the hair and darkest shadows. I had also made the print on ordinary cartridge paper, which has been my preferred support for these prints as far as maximum paint transference goes, so I mixed the paint with quite a bit of Zest-It solvent to add to the slightly blurry effect. 

I think I have partially succeeded in the colour scheme, but my work is not quite a shimmery and loosely defined as Marlene’s. I think I was partly led by the original model here, who appeared a rather definite and “strong” personality. I did try to go for some of the “echo-y” shadow type marks that she uses (e.g. hers round the cheek, mine round the mouth), but don’t think I have quite pulled it off.

Next I went back to Paul Wright and had another look at his 2015 monotype “Colour blind”.

I chose this monotype to work into:

and used for a bit of extra reference this photo which roughly replicates my expression when I did my Ex 1 painting from which the monotype was made.

After having a good look at Paul’s painting, noticing his variety of colours and line direction (predominantly going down, but by no means exclusively), I had a go. I mentally adopted his title to mine and just let rip wherever I thought the photo gave me even half a chance of interpreting a shadow as bright green, etc. Having had a bit of a frenzy of painting, I stepped back and looked, then tried to modify and adapt colour to make the tones a bit more believable – but when it all started to go to mud, I stopped.

Unusual but clunky and overworked is I think the best that can be said.

However, I do like the idea of being free in the interpretation of colour…something to experiment with more, maybe.

Next I turned to the work of Annie Kevans. She has the amazing ability to capture a likeness and convey a mood in just a few brushstrokes and without a background to give clues – which I envy – she must be so good at looking as many of her brushstrokes are quite wide, just perfectly placed. This example, a portrait of “Louise Elisabeth Vigee Le Brun”, found on her website, www.anniekevans.com, is taken from her body of work for her 2014 exhibition about women artists entitled The History of Art.

Looking carefully at her work, she pays particular attention to the eyes and, to a lesser extent the mouth, to catch a likeness. I chose one of my “surprised, viewed from beneath” prints from Ex 1 & 2, and decided to work just into these features, using a rigger. I noticed that Annie also does simple single light shadow lines in places around a feature to give it form (a bit like Marlene Dumas, above), so I added a couple of these around the eyes and mouth. Also, because I couldn’t resist fiddling, I worked a few dark lines into the underside of the hair; but otherwise I left the print as it was.

This was more of a success, although some of my “added shadow” lines are too dark and so lack Annie’s subtlety.

NOW WHAT?

Looking back, I found it interesting that the work of the three artists I chose to consider in this exercise all demonstrate some similar qualities:

  • Subtlety
  • Careful observation, so that key elements (eyes, mouth, proportion and bone structure) are correct and these underpin the image
  • A certain elusive “here and yet not here” quality

I think my own work currently is rather different, very solid, but I should like to work towards developing this more subtle and elusive style.

Painting 1 (UPM); Part 3; Exercise 3

WHAT?

  1. This blog post follows on from the previous post relating to Henry Tonks and Yuko Nasu, where I began making experiments into drawing into the image on the plate using cotton buds.
  2. Here I wanted to continue this by using a range of other tools for drawing into the image, as well as refining my cotton bud technique. I also want to move on from using my Ex 1 paintings as base images as I don’t feel they are giving me enough information to allow me to progress.
  3. I also looked at some monotype prints on the Bridgeman Education site, and was drawn to some by Maggie Hambling, for example her “​Norman Rosenthal”​, 1992 (monotype), Private Collection. I want to try some prints in this style.

SO WHAT?
1 & 2. Having signed up for membership to ​Raw Umber​, which makes available images and videos for life drawing, I chose to try one of the techniques suggested there. I made quick sketches of a model’s head and shoulders in two different poses using charcoal 3B pencil and a thick 2B pencil, trying to look just at shapes and tone, blocking in the biggest dark shapes first, and trying not to think of them as eyes, hair, etc. It was hard not to add lines but the artist commentating gave some helpful tips, including the fact that not every shape needs to be a “geometrical” shape (triangle, rectangle, etc) but can be completely irregular – just a splodge shape, or the “shape of a fish-hook” – she recommended giving the shapes these names to distract oneself from thinking of it as an eye, an ear, etc. I found this really helpful advice.

I worked on the first image as a base to experiment with tools. The brown colour was generated by a combination of emerald green, crimson and yellow ochre, and the paint was initially applied with a half-inch soft flat and a rigger. First, I used the cotton bud (with my dip-wipe-apply) technique to tidy and define lighter areas. Then I experimented with part of an old cut-up credit card to drag the paint of the neck to make it look more like a curved surface. This was fun but a little hard to control.

Next I tried actually applying some of the paint (hair and neck) with the card, and tidying it up with the cotton bud. Makes some interesting effects in the contrast between the card-applied versus brush-applied paint.

I particularly wanted to get his top-knot in, so in the last of this trio of prints I moved the plate over. I also added some pure crimson and yellow ochre to define the facial shadows and the ear, drawing into the ear in particular with my cotton bud and using the crimson very dilute, applied with big sweeps of the side of the rigger. Finally, the hair; I left the paint quite thick just behind the ear where it is really dark, to utilise the blobby effect you get when printing with thick paint, and I used the corner of a piece of kitchen roll dipped in solvent to try and get a more controlled moulding of the hair as it is pulled back into the topknot.

3. My Maggi Hambling-style monoprints.
First attempts revealed two things: first, it is really hard to get an even background to work into and, second, I couldn’t really see the image I was using for reference through the paint layer; so, you are basically into free mark making.


I drew a generic facial outline with a cotton bud; first attempt was before I had perfected my cotton bud rule, second was clearer, but still the background dominated the image.

I didn’t want to let this technique go quite yet – am guessing that MH used printer’s ink with a roller, neither of which I had. I tried applying the paint with a size 6 soft flat and then stroking it back and forth and up and down with the flat side of the brush, which gave a slightly less dominant striped background, and then worked into it with a cotton pad dipped in solvent to make the image. Again, some interesting directional marks possible, though detail unclear.

Finally a bit of inspiration struck, and I tried smoothing out the paint surface on the glass with the soft edge of a feather – best yet. I then tried lifting out paint using the quill end of the feather dipped in solvent to make the image and really liked the delicate quality of the outcome.

NOW WHAT?

  • I feel I have grown in confidence with my portrait drawing by focusing on tone and shape – much more practice needed, though
  • I have found some useful tools for working into the paint while it is on the glass before printing – favourites are:
    • Cotton bud in solvent
    • Small piece of card
    • Quill end of a feather

Painting 1 (UPM); Part 3; Research – Henry Tonks and Yuko Nasu

WHAT?

Read an interesting article on the Science Museum blog on 23rd June 2016 by

Stephanie Millard entitled “Exposing the Face of War”, which described how the artist Henry Tonks worked alongside an ENT surgeon called Harold Gillies in carrying out (Gillies) and documenting (Tonks) pioneering plastic surgery on WW1 soldiers who had suffered devastating facial injuries. An example of that work is shown here, taken from the Museum’s Wounded exhibition; the sketch was done in pastel, and is © The Royal College of Surgeons of England.

Several others can be seen on www.gilliesarchives.org.uk under “The Tonks Pastels”.

Having looked at these images, I went on to look at the work of Yuko Nasu, particularly on her website, www.imaginaryportrait.com; here is “Lucas” from her Imaginary Portrait series, shown at the ZiZi Gallery in London in 2007.

Her pulling of the paint to distort an image is very characteristic of her work, and she often does this around the eyes, the hair and the face edges.

SO WHAT?

Leading up to Exercise 3, I chose one of the 1-minute portraits from Ex 1 and, using some new Jackson’s oil paints which arrived over Christmas, played around with images painted on the glass.

For the first attempt I was just getting used to the paint and the way it diluted with the Zest-It, trying to gauge how much to put in, etc, so I just tried removing paint with a cotton bud. Limited success – but I learned that, once some paint has been removed with the cotton bud, unless you do something about it, it will go straight back down on the glass wherever you next touch the cotton bud. Also, dragging paint with the bud works up to a point, but then some of the dragged paint gets deposited where you might not want it – so direction of drag is important.

For my second attempt, to try to deal with the problems encountered above, I tried dipping the cotton bud in solvent. Much learning went on here about dropping too much solvent onto the glass as it makes the paint go in lots of directions you don’t necessarily want (see e.g. the mouth).

For my third attempt I wanted to try some directional wiping with a bit of kitchen roll dipped in a little bit of solvent, as I understand Yuko Nasu does to obtain her distorted images.  This went OK inasmuch as I did manage to pull the paint around directionally – however, my dragging was a little wild and the actual shape of the face is quite distorted; I suppose I should have seen this and wiped that part off the plate before printing, but it didn’t look quite so weird on the plate as it did on the print.

NOW WHAT?

Lots of learning here:

  • Cotton bud technique: dip the bud in solvent – wipe excess solvent/paint off – apply to plate. Repeat!
  • Wiping with a bit of rag/kitchen roll:
    • If it has solvent on, be aware that it can take quite a bit of paint off the plate and leave your image faint in places
    • It”s fun, but you can’t quite see what you’re doing in the same way as you can removing paint with a bud or brush, so be prepared to adjust
  • I’m realising that the reversal of the image is making the outcome rather unpredictable for me; I hadn’t realised that reversing an image would make it “look” quite so different. Something to get used to with practice, I suppose. Might try looking at the plate from the back before printing to see if this helps me decide what needs adjusting.