I hunted around my studio to find some objects/materials with which to apply paint. I worked in water-mixable oils on oil-prepared paper, using mainly lemon yellow and cobalt blue (a combination which I thought would be helpful to me in distinguishing layering from blending), with just the end of some burnt umber which was already on my palette.
SO WHAT?
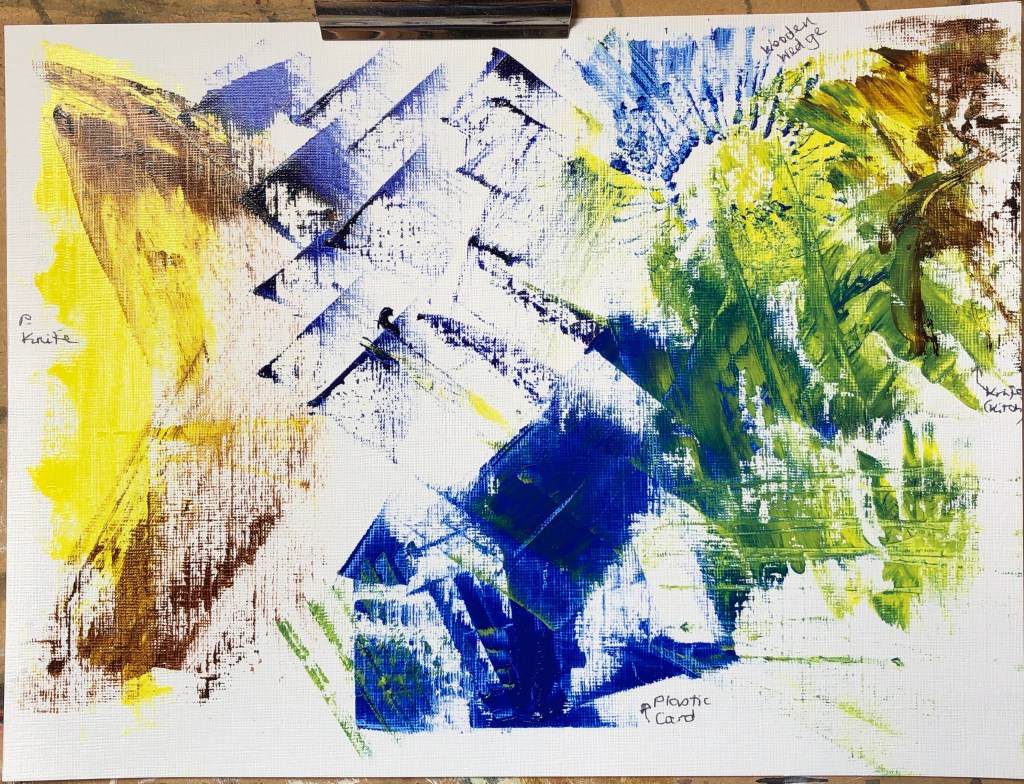
On this first sheet I experimented with a painting knife, a credit card, a wooden wedge and an ordinary rounded kitchen knife. I had previously thought of knives as a way of applying paint quite thickly, and was surprised by just how thin a paint layer can actually be achieved. I looked at layering and blending – I did find the painting knife the best for laying flat layers on top of each other, although I had fun making marks with the wooden wedge.
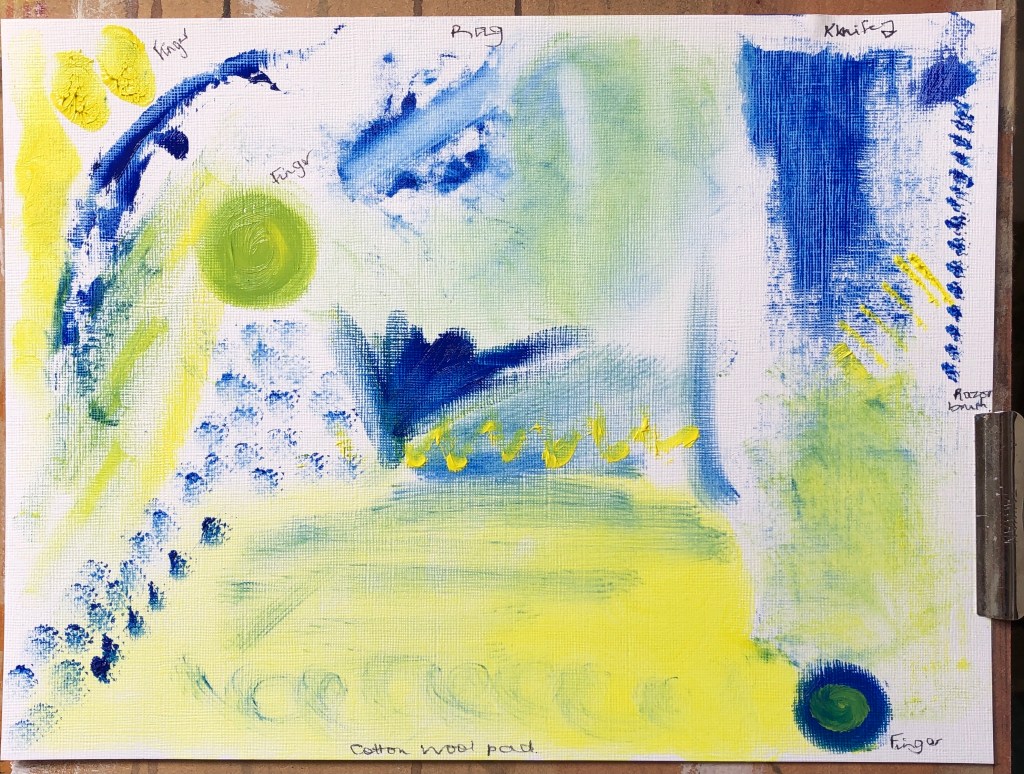
Next I used a combination of a rag, my fingers, a cotton wool pad and an old shaver cleaning brush. The latter was useful for mark-making on top of an existing paint layer, but the other three were more effective at blending. The rag and pad really allowed for some thin initial layers of paint, but adding further layers on top was tricky without blending occurring. It was hard to get accurate edges – the best for this was a finger, although you’ve got to be careful how much paint you use; too much and it stands up from the paper when you take your finger away – great if you want texture, but not otherwise.
NOW WHAT?
The most useful learning I did here was finding out about applying really thin layers – up to now, if I wanted a thin layer, I’ve been using dilute paint, whereas now I see that a rag with undiluted paint will do as well for a first layer, and dragged knives are good for subsequent layers with minimal blending.
I have decided to work with oil paints, partly because I need to learn more about them, and partly because I sometimes have to break off work suddenly in my role as full-time carer, and oils stay wet whereas acrylics dry up on me.
To begin with I have two sets of brushes and paints, one upstairs in the attic and one downstairs. I appreciate I shall need to mix them at some point.
SO WHAT?
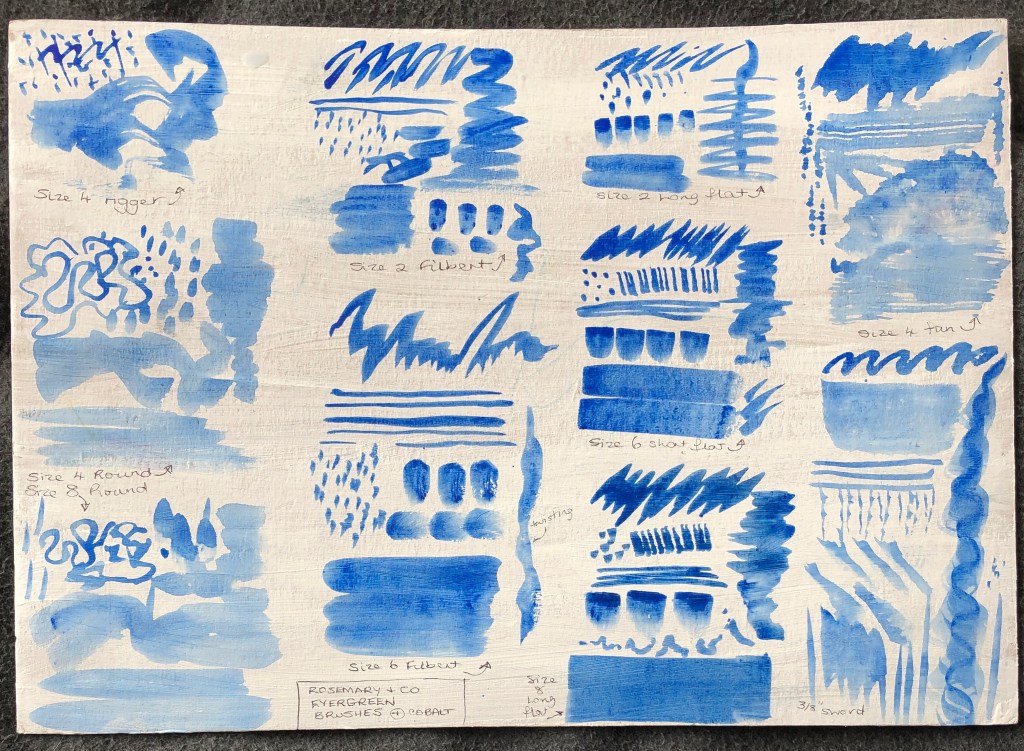
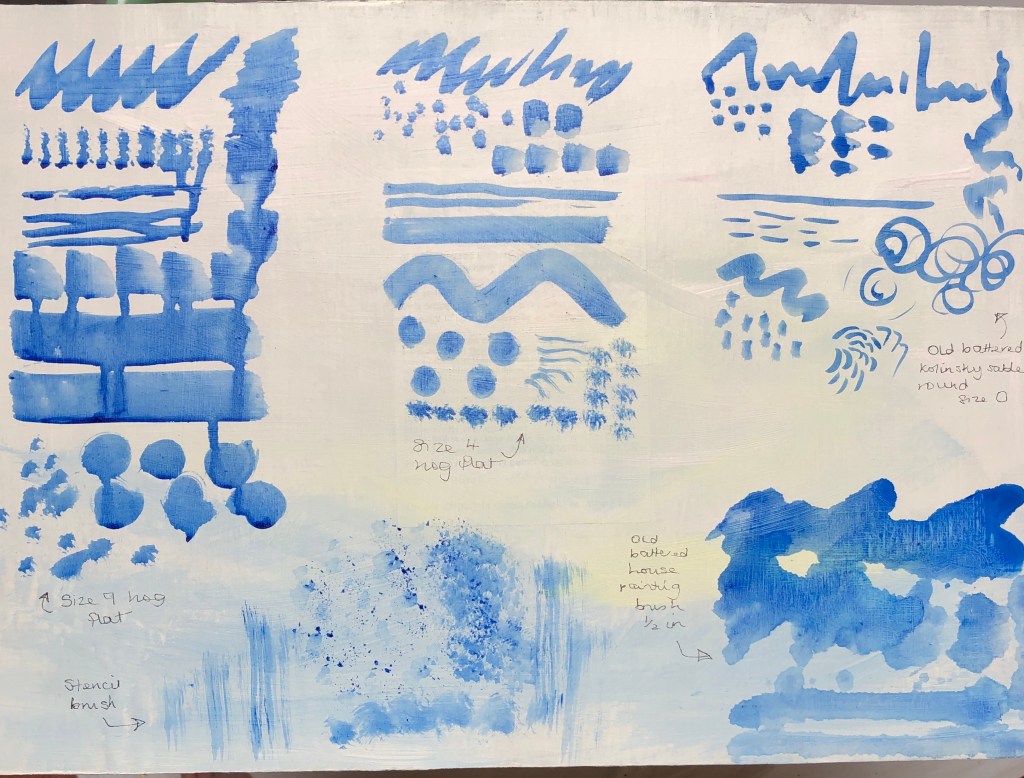
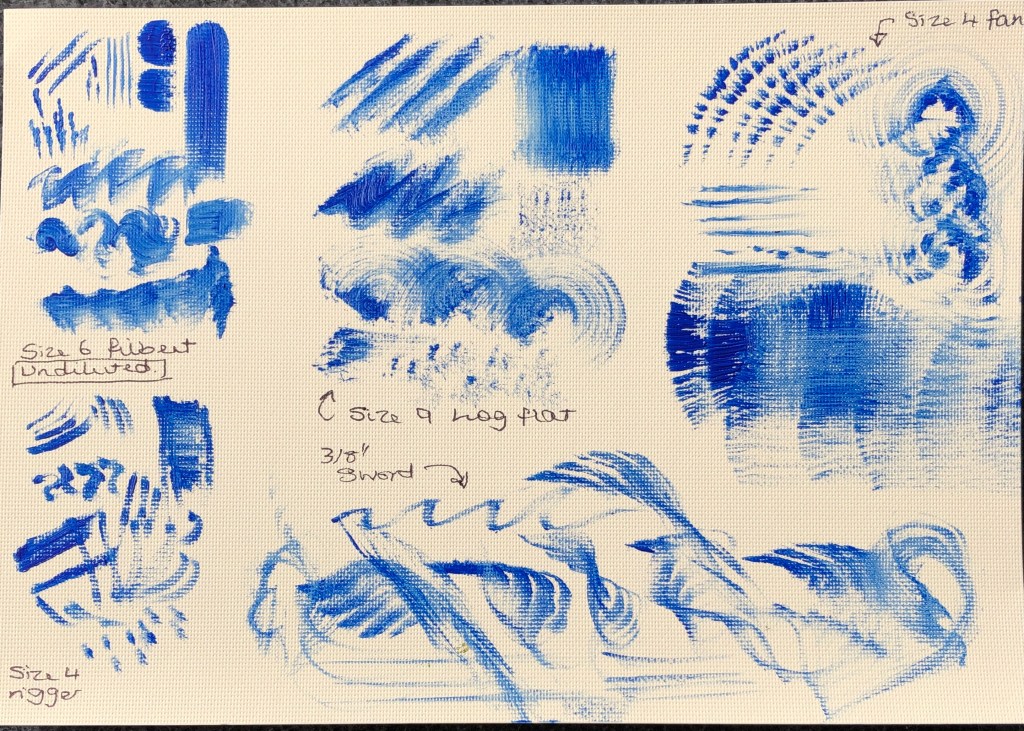
I made a range of marks with my upstairs paints, which are Cobra water-mixable oils, and my brushes, which are a set of alla prima brushes from Rosemary & Co, quite soft bristles. I worked on a bit of cardboard which had previously been coated back and front with gesso. My paint was diluted (with water) and I found that it ran overmuch on this surface and made some marks indistinct, so I did a few more with undiluted paint on oil-prepared paper:
I also tried my downstairs set, mainly bristle flats, rounds and filberts, using Jackson’s oil colours, just slightly diluted with Zest-It, on oil-prepared paper:
I found that:
Most brushes were capable of a range of marks
The flats give a slightly crisper, cleaner edge
The sword and the fan allow for special effects
The numbers on the brushes seem peculiar to the range – for example, a size 10 in one range is much bigger than a size 12 in another
Possibly one gets what one pays for – for example, my more expensive hog flat gave a crisper, better defined mark, and was much easier to clean at the end, than my cheap brush.
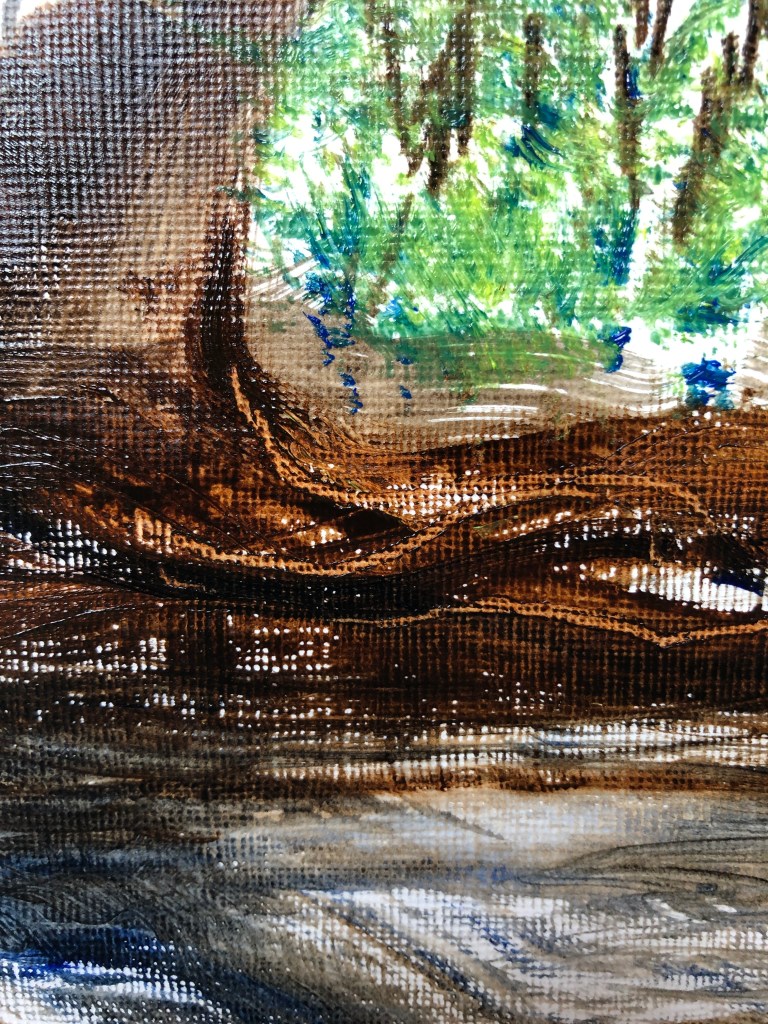
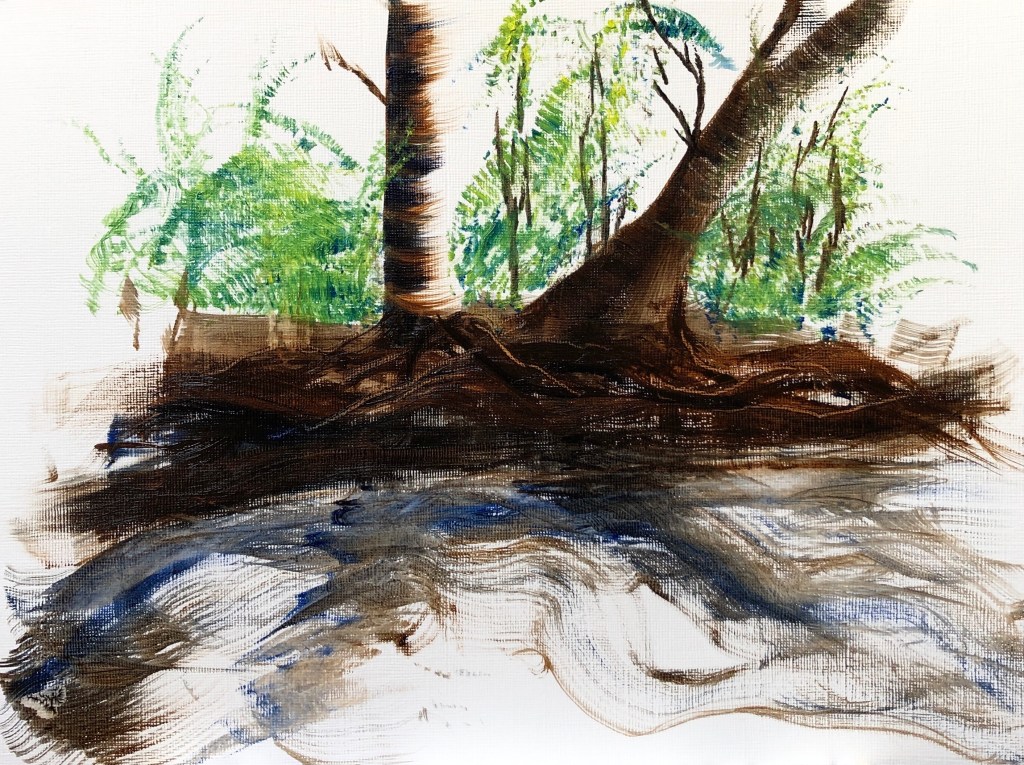
Next I painted a landscape from memory, a much loved (and much-drawn) section of riverbank on the River Tavy just down the road from our house.
I used my Cobra water-mixable oils (burnt umber and ultramarine for the darks, cobalt blue and lemon yellow for the greens) and three brushes:
A size 8 flat for the trees and bank
A sword for the tree roots in the bank (also drawn into with the solid end of the brush for highlights), and parts of the water
A fan for the foliage and parts of the water.
I worked onto prepared oil paper, size A4. In my memory, the sunlight shone from behind and to the right of the trees:
I really enjoyed the precision of the flat and the dragging marks possible with it. I was a bit “jabby” with the fan but I can see that, with practice, it has potential to be useful for layers of foliage, and also for colour mixing on the surface (I picked up bits of separate yellow and blue). The sword also has promise for those narrow-wide-narrow flowing marks, a bit like italic script, but I need to work more at learning how to handle it for less random effects.
Finally, I set up an apple on a white sheet of paper to explore using my large size 8 Winsor & Newton hog filbert. The lamp was directly overhead but I was sitting in a conservatory and, even though it was a very overcast and rainy day, there were multiple shadows. I made a quick biro sketch in my sketchbook, then set to work painting on oil-prepared paper using Jackson’s oils diluted with Zest-It. My small palette consisted of crimson, yellow ochre and ultramarine violet.
I discovered two main things:
Getting a clean edge with the filbert was not easy – my apple has become quite distorted in my efforts to tidy up the edges!
The paint that is carried along by the brush as one makes a stroke gets “dumped” at the end when you take the brush off the paper – to be considered carefully.
NOW WHAT?
The exercise immediately sent me back to a book I had recently acquired: Auping, M, Elderfield, J & Sontag, S (1995), Howard Hodgkin Paintings, Thames & Hudson Ltd, London. Close scrutiny of his later works allowed me to pick out many of the marks I had made in the first part of the exercise and to “work backwards” through his paintings to identify how he had constructed them.
This also reminded me of a remark made by my previous tutor: “A brushstroke has a beginning, a middle and an end”. I could identify this in Hodgkin’s paintings. In my landscape, I could see that the most effective marks were those where I had thought about the beginning and end (having previously been someone who just “goes for” a painting, and ends up with a lot of unresolved middles as a result). The beginnings and ends of the strokes became clearer to me as very different beasts when painting the apple with the large filbert. So, my way forward: don’t just go for it, stop and think about all parts of each stroke. Should be quite meditative if I can pull it off.
Tanya Wood and Alex Hanna were the two suggested artists whose work resonated most with me. Tanya’s detailed drawings are so closely observed; I looked at her work on her website, www.tanyawood.co.uk; her “Edges” series was my favourite, great tonal contrasts, and I also liked the way she often leaves much of a page blank. Alex Hanna’s work, as seen on www.alex-hanna.co.uk , shows such range, from his closely observed and “sharp” paintings of everyday things like curtains, to his loose, impasto, more abstract images.
In this Exercise, I was looking to:
achieve something like Tanya’s tonal range, but also some of Alex’s gestural stroke making
Use my water-mixable oils in a less frantic, more measured style (I watched a video by Raw Umber Studios recently advocating more thought with one’s brush-strokes)
Try to use my long-handled brushes at their full length by standing back a bit when I’m painting
Play around with gesso
SO WHAT?
My three items of rubbish I found in my studio; salvaged and repurposed items rather than throwaway – an empty CD case, an empty bath oil bottle, and an empty yoghurt pot.
First I prepared my canvases. I applied a coat of gesso to each, but mixed a tiny bit of oil paint into my gesso first (Cobalt blue, Lemon Yellow and Persian Rose). When the surface was covered, I immediately painted very thickly into it with the leftovers of the gesso in a rough outline of each item, so they looked like this:
(the rose canvas photo is a detail, didn’t show up well otherwise), and then as soon as the gesso felt dry to the touch I covered it with a dilute coat of titanium white.
While that dried I made my sketches, using a 4B pencil:
I was going to use a limited palette of titanium white, ultramarine blue and raw umber for all three paintings; the colours I had used to prepare the canvases were fairly strident, even when covered with white, but I wanted something rather less obvious for my transparent items, and I also wanted the ultramarine to give me a wider tonal range than the cobalt might have offered.
I played around with my three colours (two colours plus white? Is white a colour?) before beginning, making myself a little colour card of possibilities:
I was pleased with the range of tones, and also with the olive-green I could mix, and the lush grey range. Beginning to see why, whenever you buy a “beginner’s” set of paints, they nearly always include these three!
Painting with a small long-handled filbert, I began to paint, starting with the bottle.
It was a lot to remember…stand back, use the length of the brush, careful gestural strokes – but I did find that the length of the brush actually made me slow down just to control it, and that I really enjoyed making long slow strokes, which I hadn’t really experienced before with my habit of being closer to the painting. I added the shadow, then decided to block in the background with some light strokes of a fan brush. I was grateful in the end for the yellow ground, which helped get the colour of the “inside” of the bottle.
Next the yoghurt pot. Again I worked with the filbert.
I felt slightly constrained by my gesso underpainting at first as I had made it fill the height of the canvas, but it did turn out useful in helping convey the internal curves. Because the image was so large in relation to the canvas, I decided to omit any background apart from the cast shadows. I’d chosen the rose underpainting for this, I had been worried it would dominate, but actually it just makes the painting feel a bit warmer.
Finally the CD box. I’d been putting this off because of the straight lines, which indeed proved tricky, so I decided to abandon any attempt at photorealism and go for an impression. I emphasised the shadow and added the final reflection with a swipe with the fan brush. Again I decided to leave out the background apart from the shadow – my streaky blue underpainting felt sufficient.
NOW WHAT?
Looking back to the factors I wanted to focus on in this exercise:
I feel I did well with my tonal range in the bottle and the CD case, less so in the yoghurt pot; also I managed some gestural marks – some long curves in the pot and also slightly spiky shadows in the CD case, which I hope convey the rather brittle nature of the plastic.
I worked hard at remembering deliberate strokes; had a few lapses into frantic, but better than I usually am.
Using the long-handled brushes at their full length consistently did not come easily, but the only way to do it seemed to be to commit to the stroke; tentative strokes invariably went wrong.
My coloured gesso underpaintings have largely contributed positively to the final images, although my attempts to create rough raised images were a bit hit and miss – helpful when I’d got the underpainting right, annoying when it was slightly out of place. Jury’s out on this.
Also, I enjoyed working with this particular limited palette combination – offers lots of possibilities – to be used again.
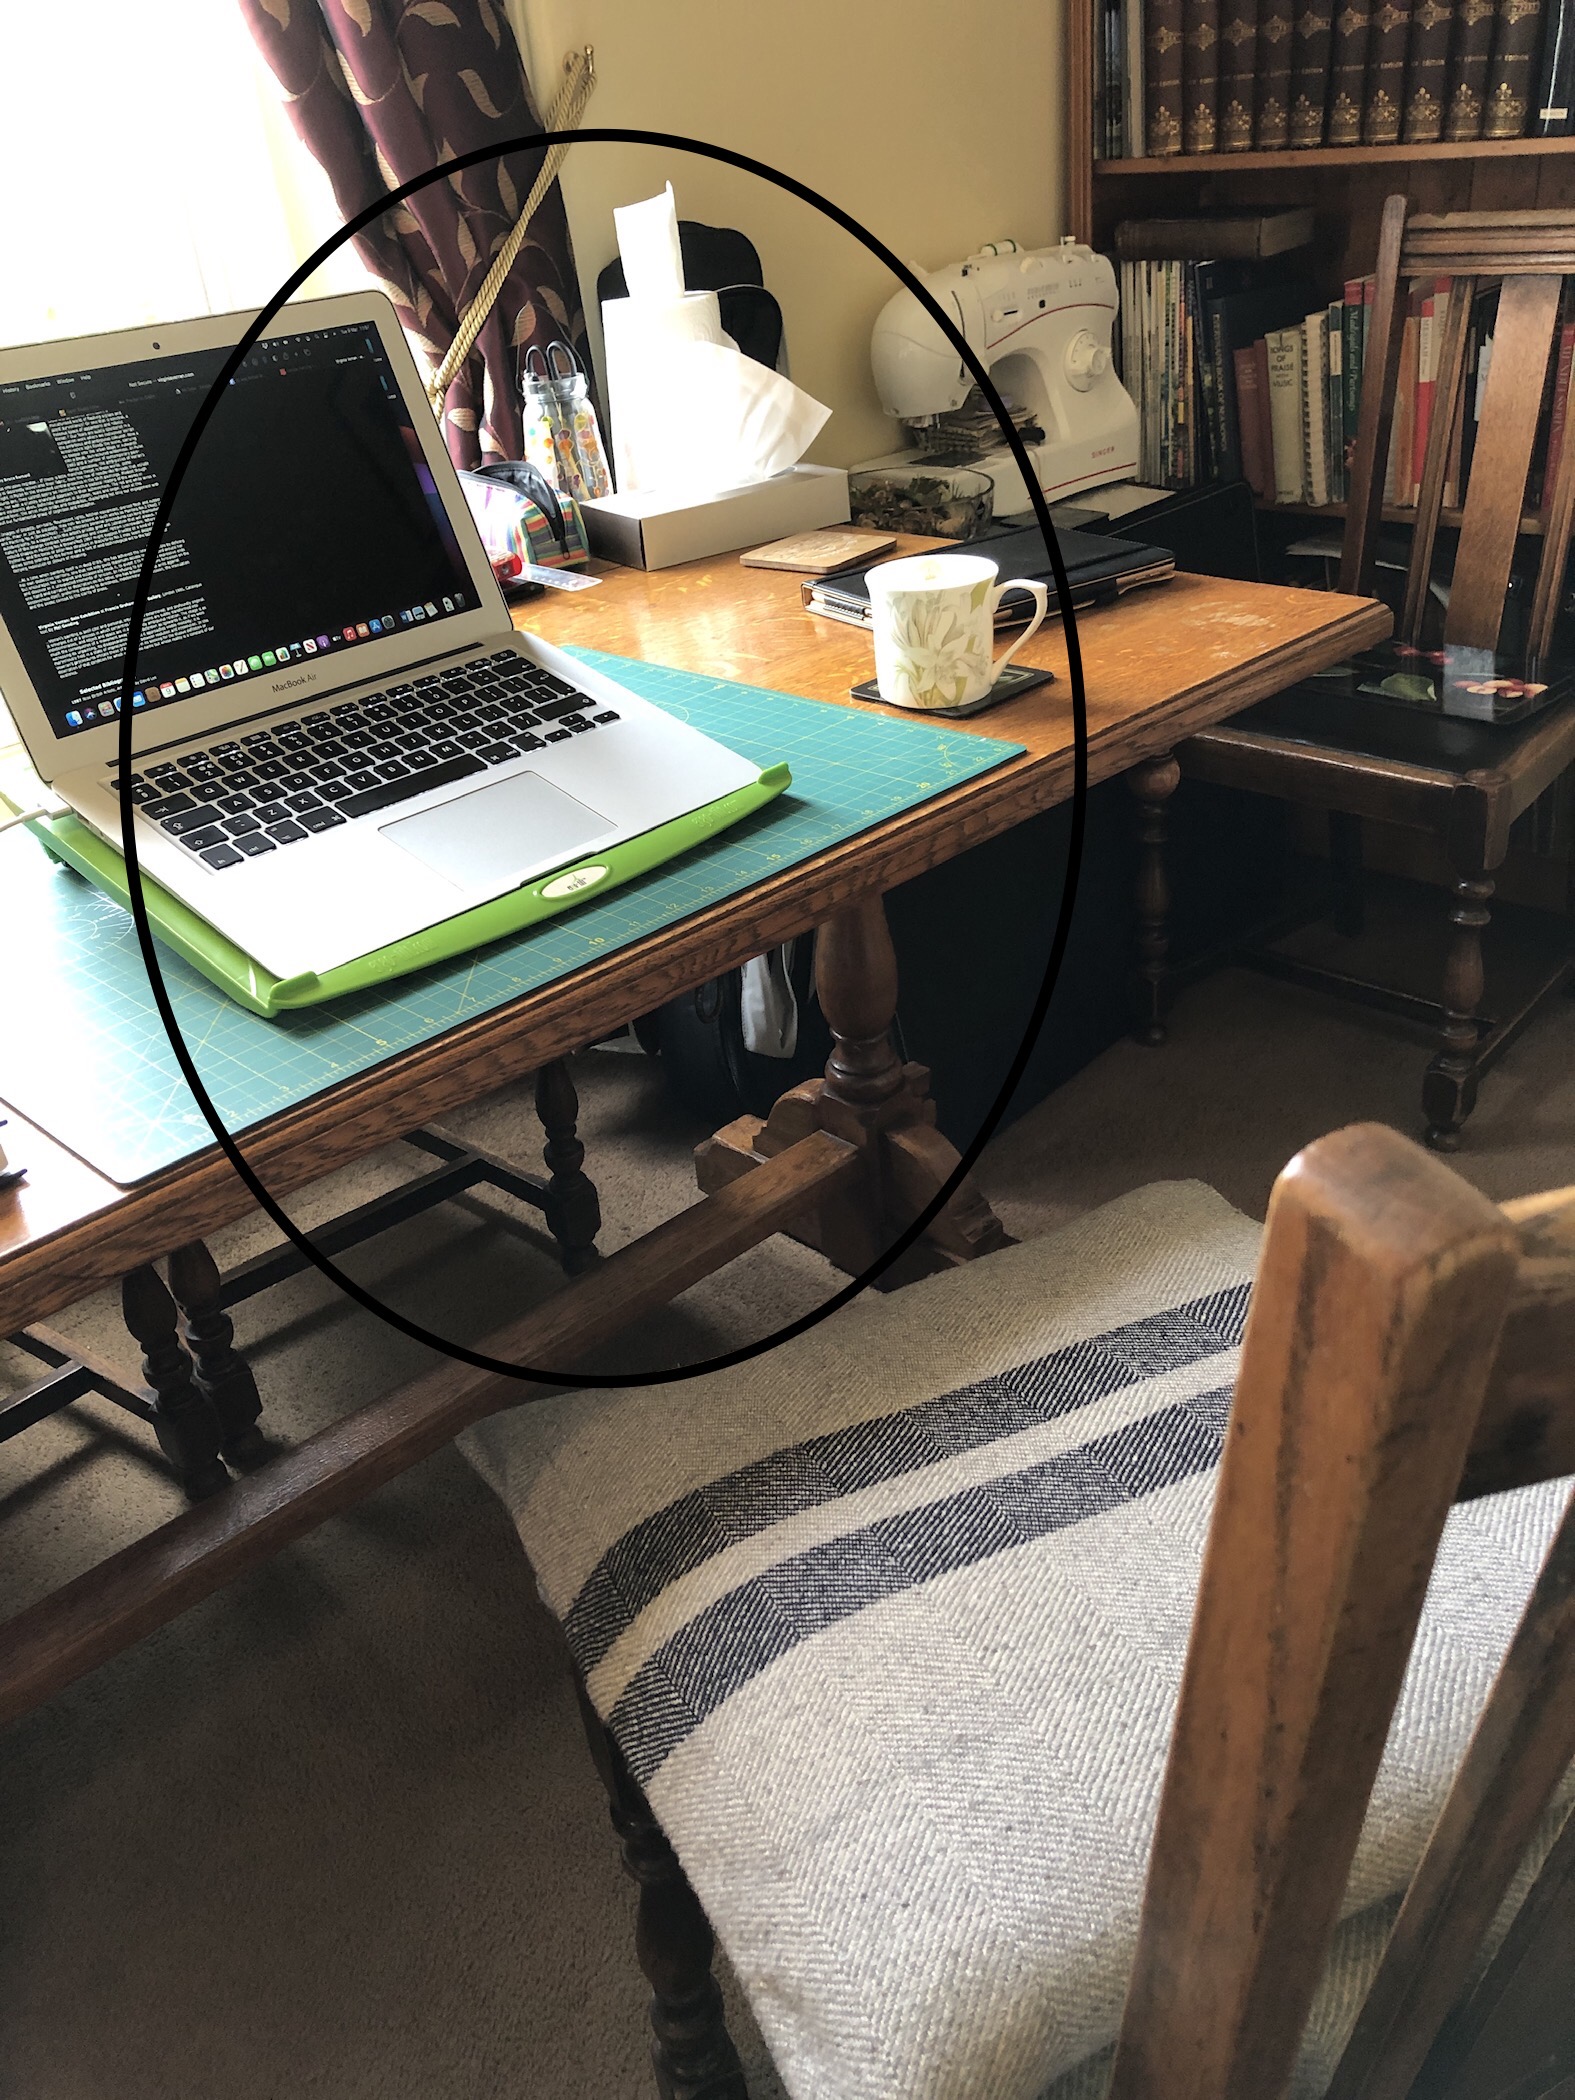
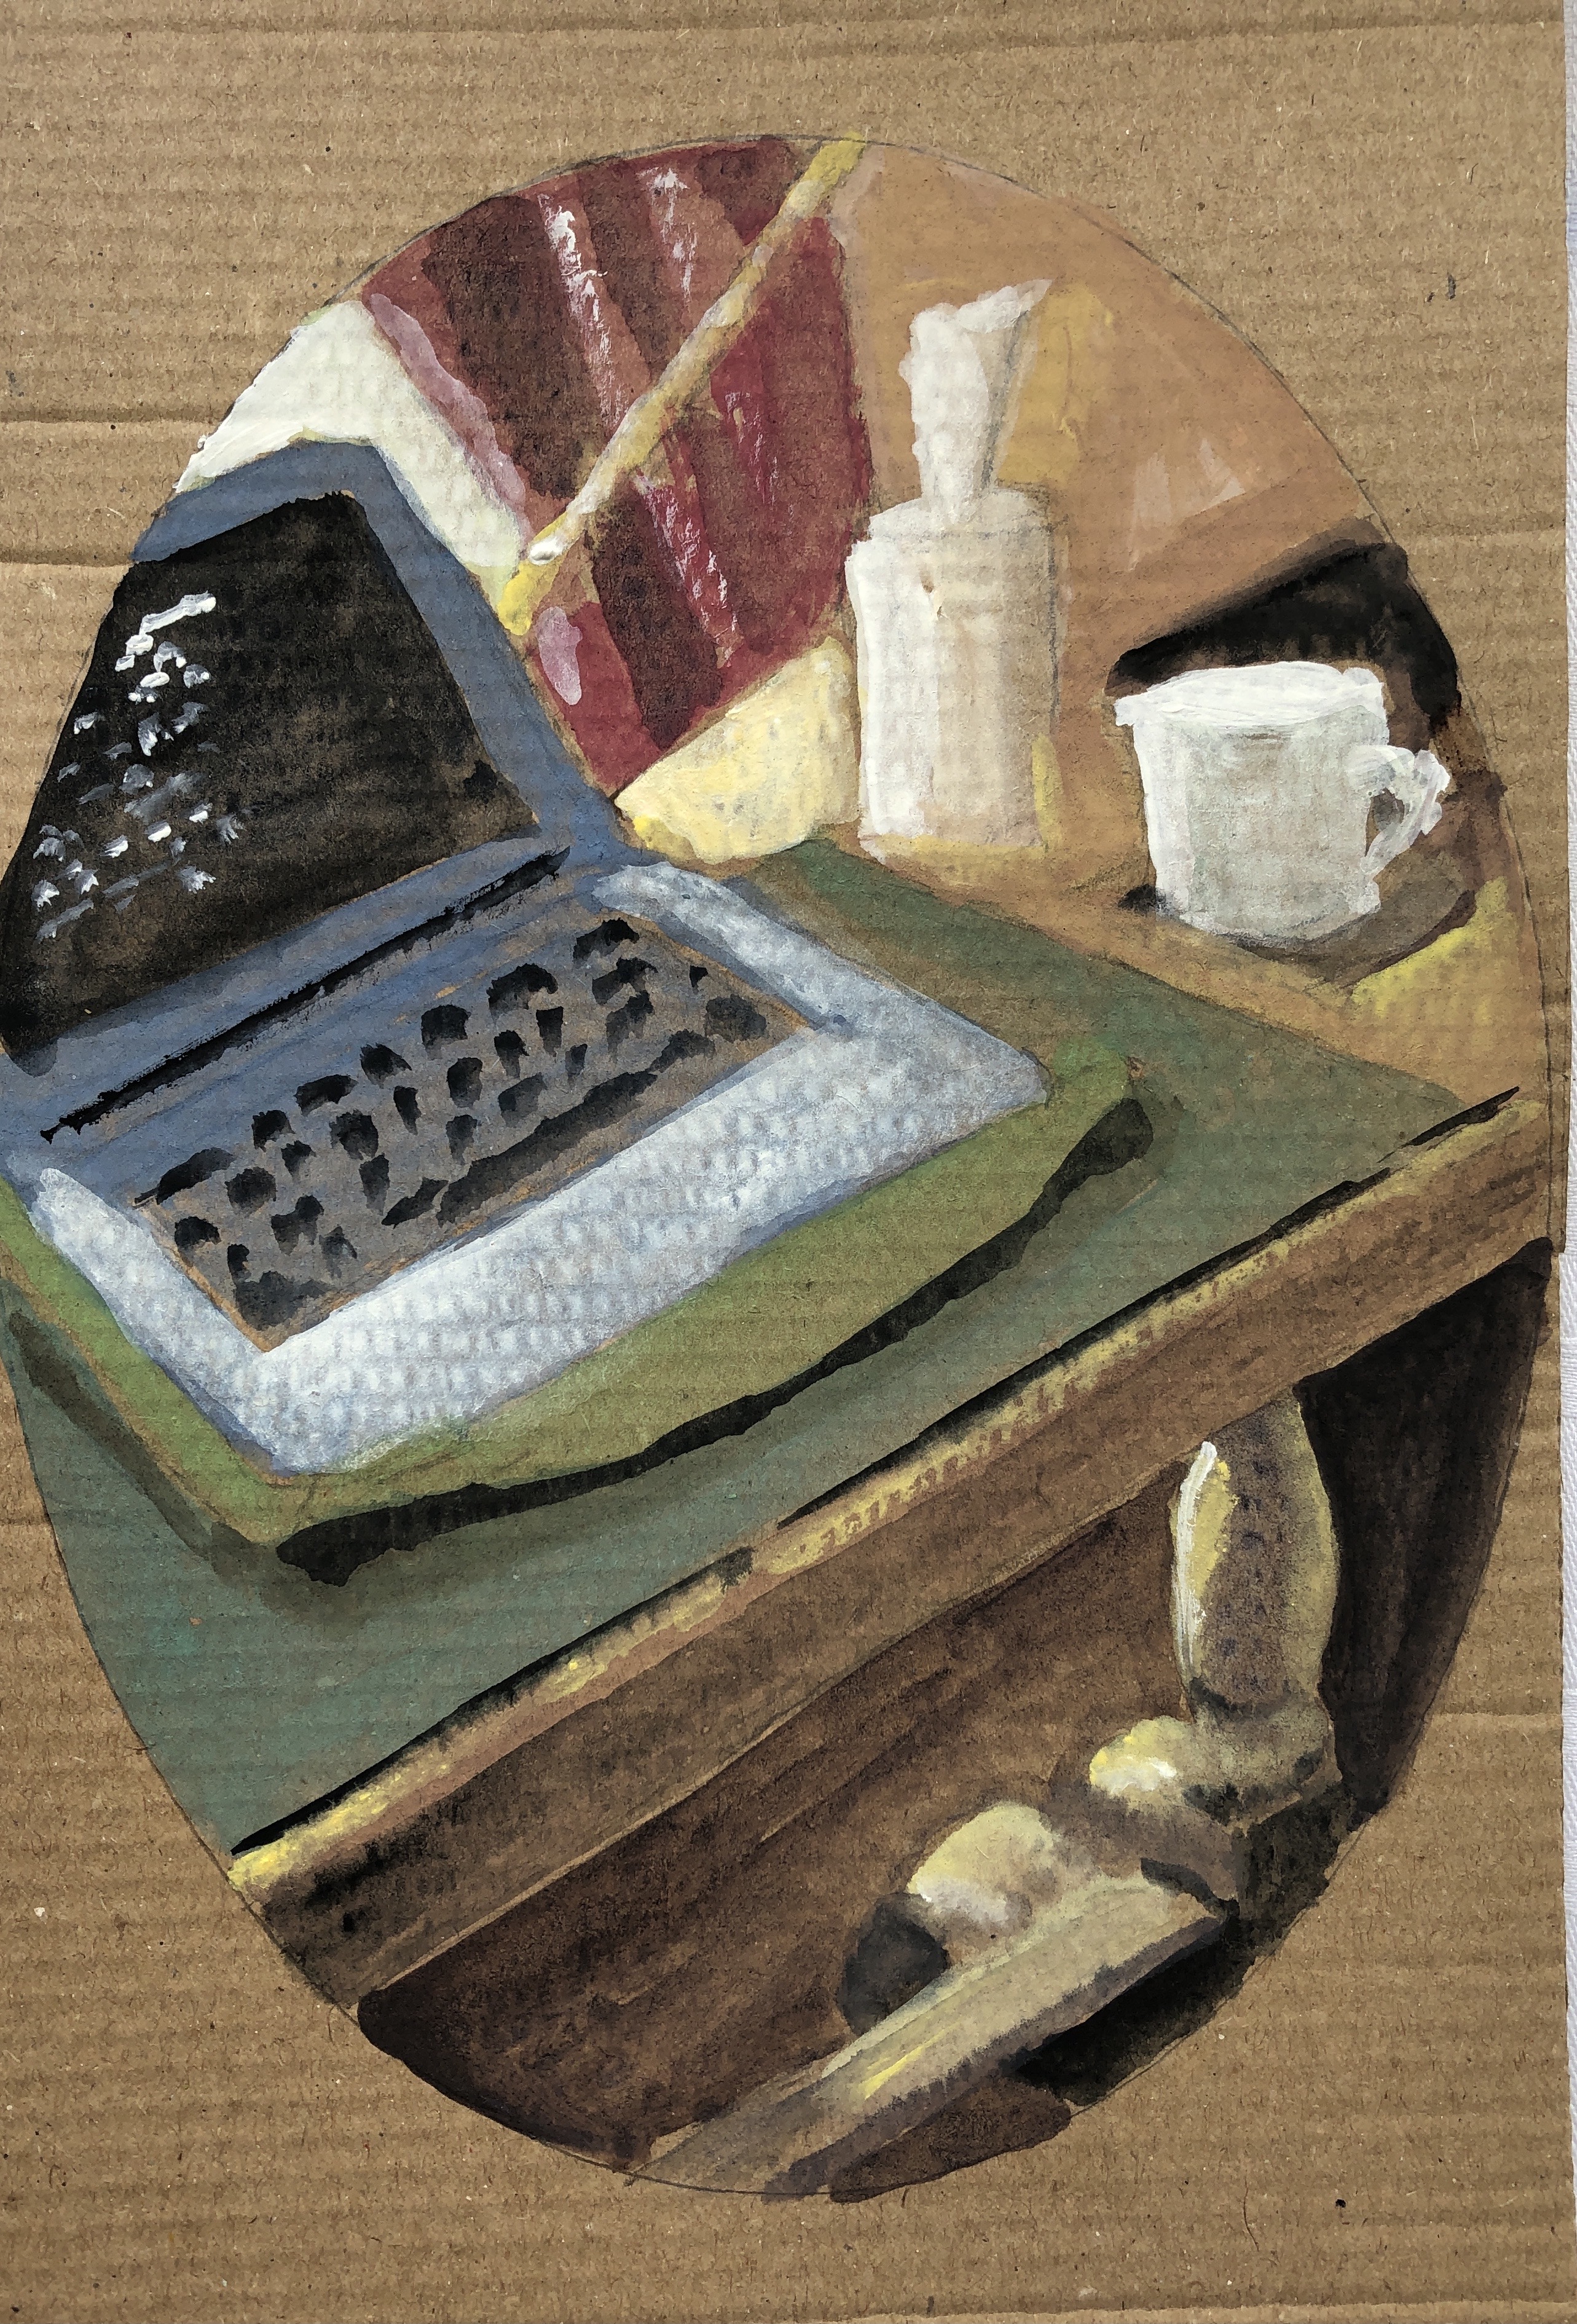
Having enjoyed painting with inks in Exercise 2, I kept my size 6 sable and my ink bottle (I had cleaned up the water dish, so no possibility of dilution) and just painted the desk of the bureau where I was sitting. It’s an old piece of furniture, lots of nooks and crannies, and all rather dark, partly because the wood is dark, and partly because it’s tucked away in a corner out of the sun. Lots of old bits of inky kitchen roll hanging around from exercise 2!
It made me consider my interior and where the sunlight falls through the day; it’s a North/South facing house, no windows facing West and East windows quite overhung by trees, so unless you are in a South facing window-ed room, our light is fairly even. So… up to the front South facing bedroom.
I had been looking at Bonnard’s paintings of interiors. Many of these paintings include an exterior view, usually incorporating light and gardens; however, even in his strict interiors, such as this:
Interior with flowers
Oil on canvas
he manages to get brightness and colour into what was probably in reality a dark corner with some fairly overbearing heavy furniture.
SO WHAT?
South-facing bedroom it is.
I went with watercolours again as suggested. Again I took a limited palette, but this time chose aureolin, a sunnier yellow as my main, along with ultramarine blue and warm sepia as before. I actually painted into my sketchbook, so on slightly cream cartridge paper, intending just a couple of dashes of bright orange for my bit of zing.
I did some mixing of my three main colours on the page as my version of “colour cards”. I remember seeing an exhibition of the work of Otobong Nkanga at Tate St. Ives a couple of years ago, and noticed that she often put small blobs of the colours she used at the side of her paintings.
It’s tricky for me to guarantee that I’m in a particular place painting at a given time of day due to my caring responsibilities which are sometimes unpredictable, so I knew that this exercise wasn’t going to go exactly as written. I had intended to paint a bit of my dressing table which holds a carousel of beads (where the bright orange zing was going to go). However, after a quick sketch I decided this was too fussy, and instead painted a darker corner by the window. I mainly used the aureolin and sepia for this – it was a dreary, rainy afternoon – reserving my bright blue for my point of zing, as per Sickert’s “The Blue Hat” (see earlier blog post).
The next morning was not quite so dreary, and I omitted the chair and pile of clothes and just tried to compare the three walls and bit of curtain; the walls look different depending on their orientation, despite all being originally the same colour.
I felt I didn’t have it quite right, so decided to abandon the yellow and just make a monotone tonal sketch using the blue. I cheated a bit, by taking a photo of this corner and changing it to the mono setting, and saw immediately what my issue was – I knew that the curtain was a cream colour but hadn’t allowed for it looking darker because it was in shadow:
NOW WHAT?
I confess to feeling a bit fidgety about this exercise at the start; I didn’t particularly want to work in watercolour, was struggling to find much variation in light around the house in frankly miserable weather, and didn’t think I could manage the suggested timings.
However, I have learned/confirmed that going with the flow is OK and that what you first intended to do (paint in style of Bonnard) isn’t necessarily what you end up doing (paint in style of Sickert and investigate tones); this has been said to me before, but most recently in the OCA workshop in April 2021 with OCA tutor Clare Wilson. And I found that letting go and following my interests made me feel better about my work, even though the outcomes are a bit scrappy.
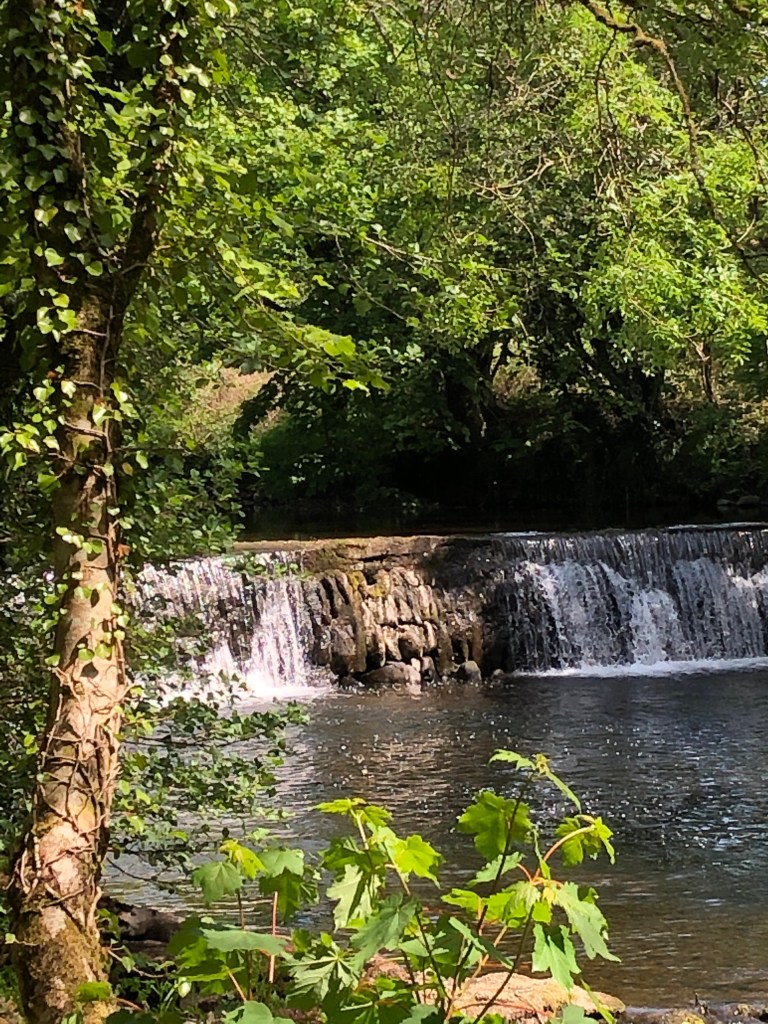
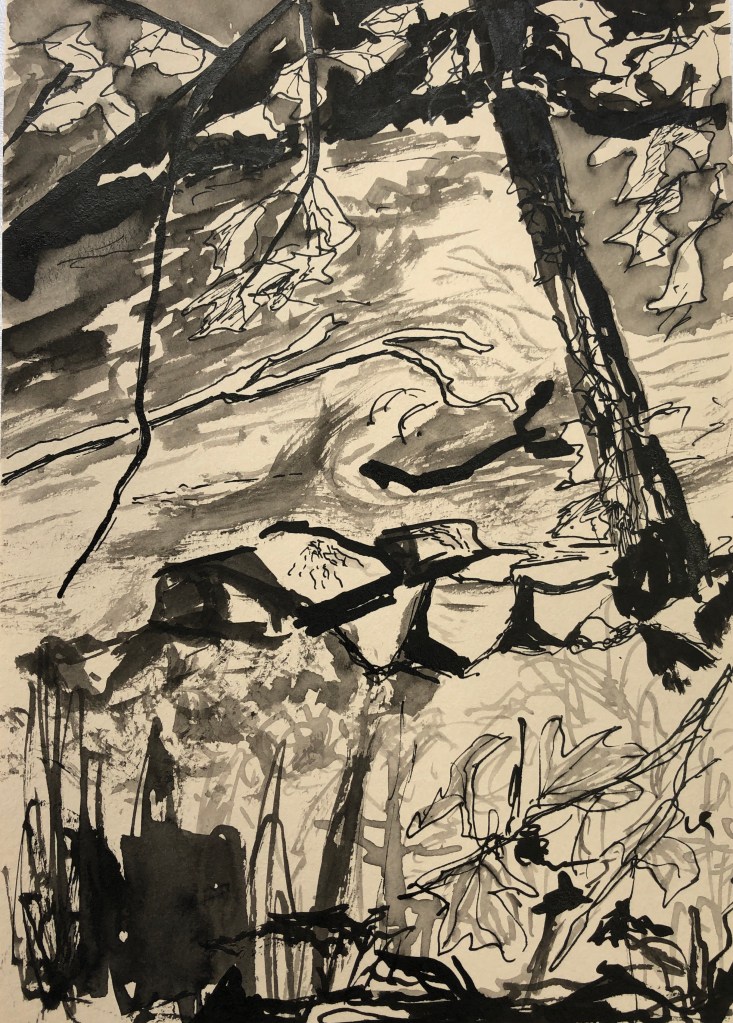
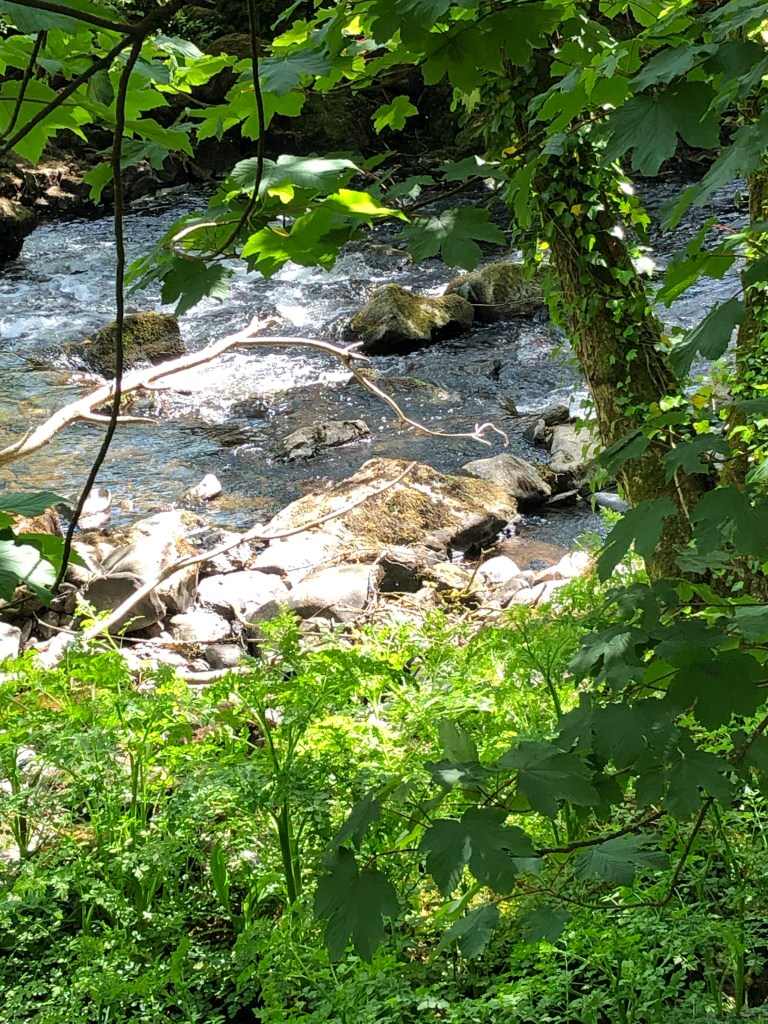
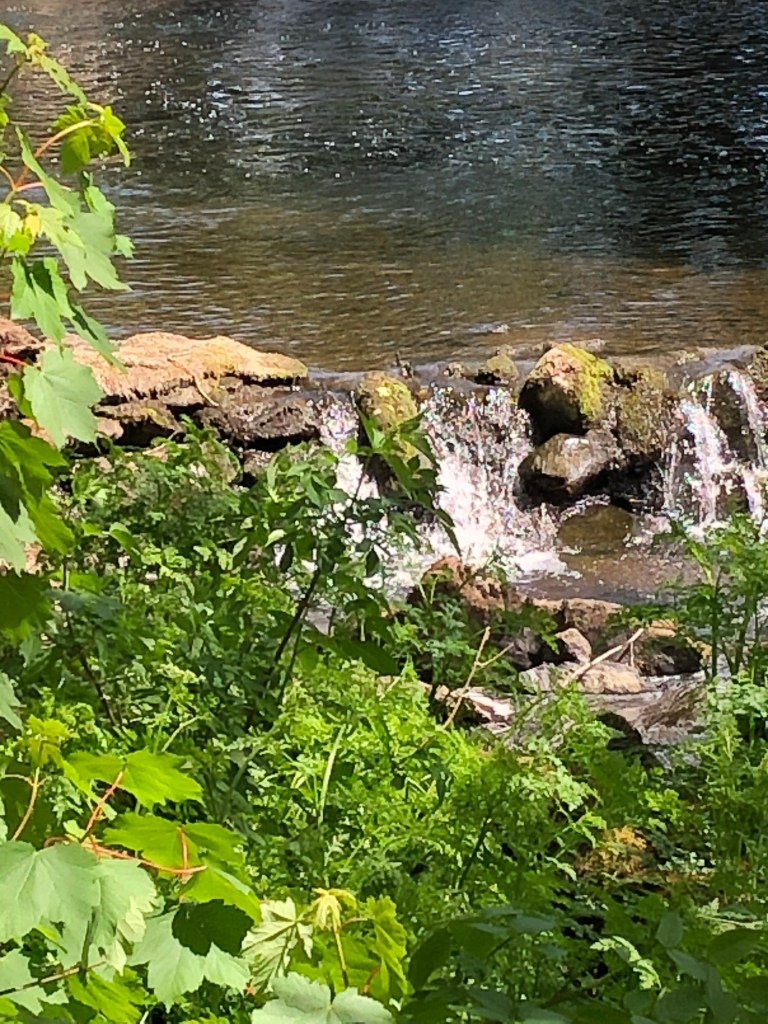
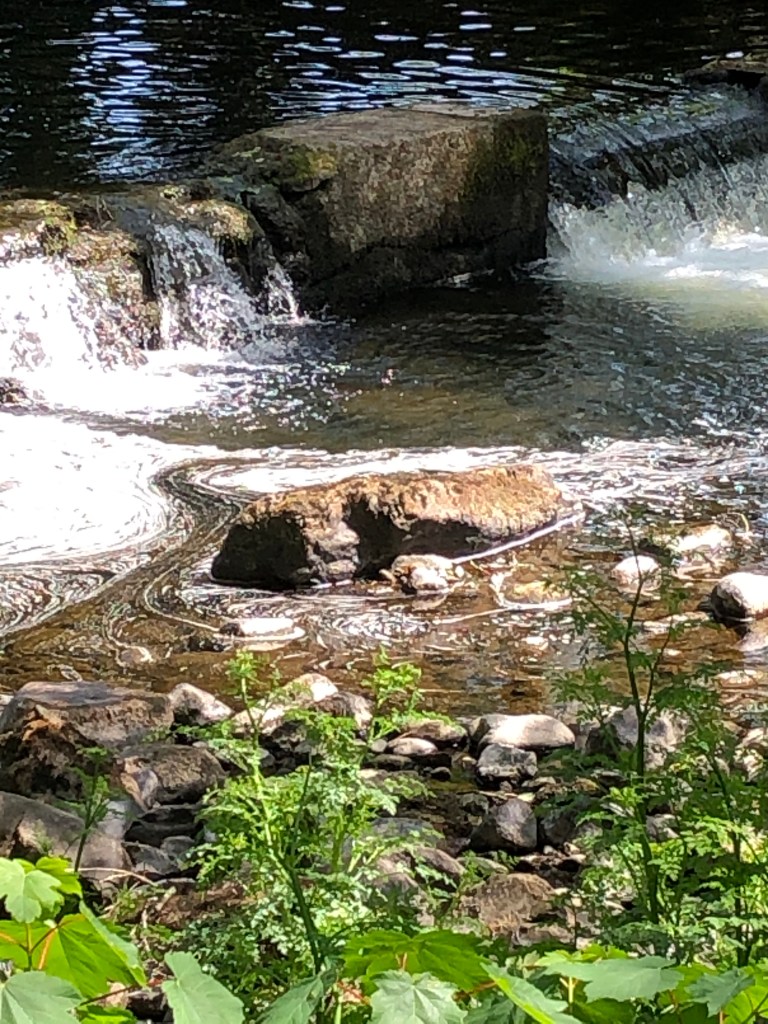
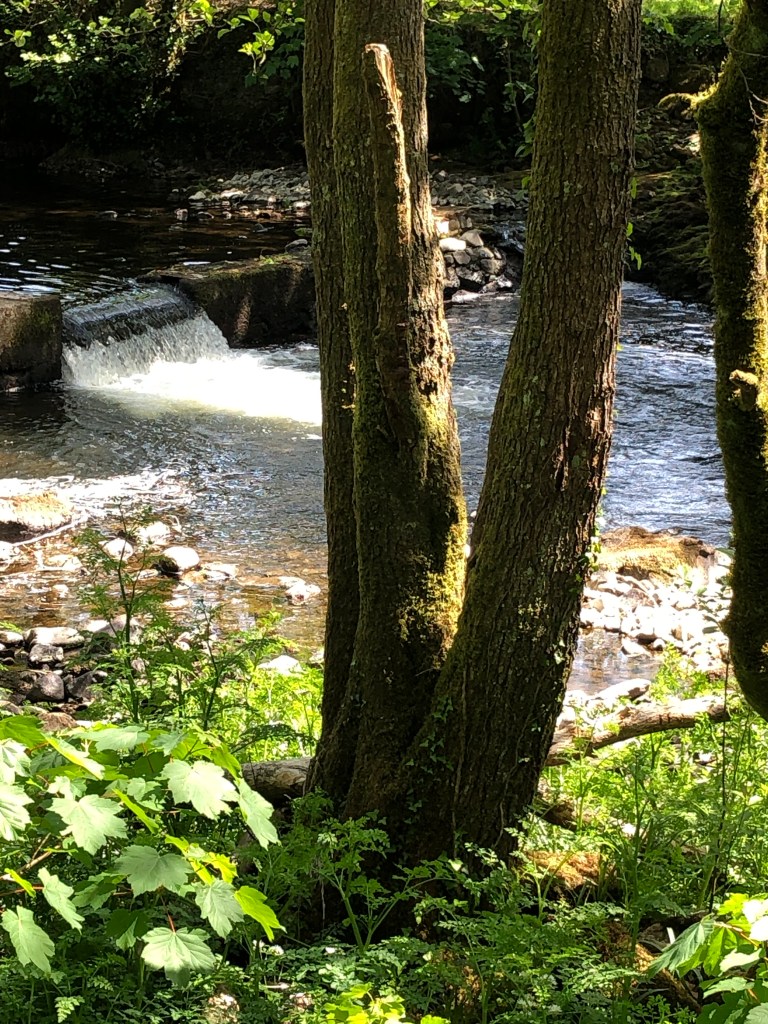
Five minutes down the road from my house is a weir on the River Tavy – a very favourite place and one to which I go whenever I need a bit of headspace – so it seemed the ideal spot to dwell upon a little for this exercise.
SO WHAT?
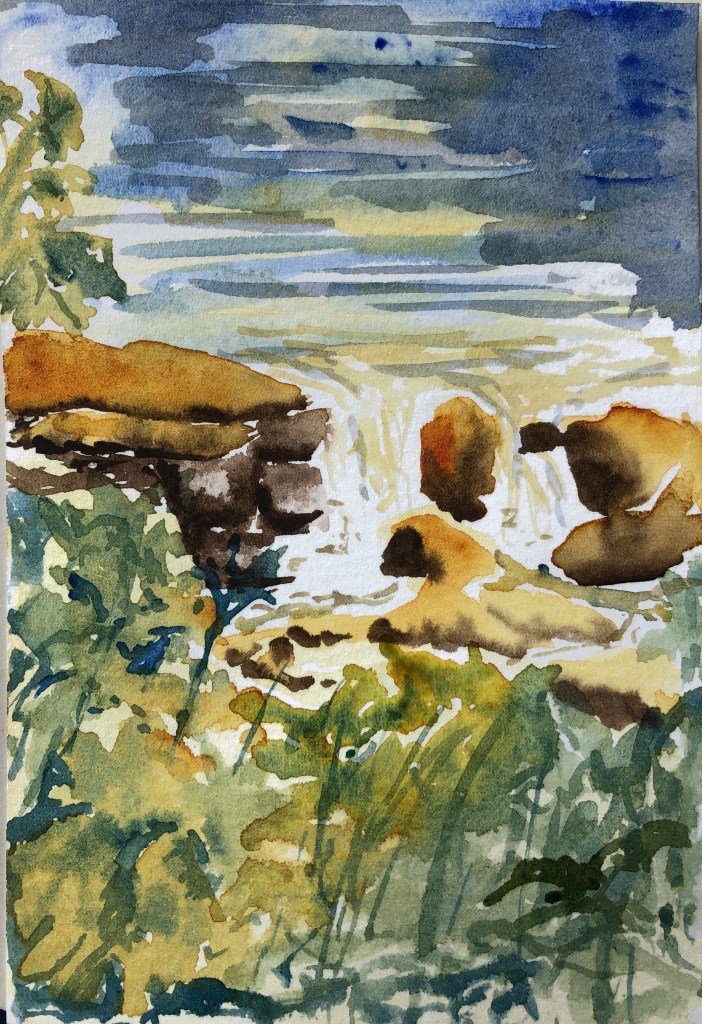
I began with the ink paintings – I used ink a lot in Drawing 1, I love it, and it always feels like my “coming home” medium. I used black Chinese ink, which always dries slightly greyer than it looks when wet, applied with a rigger, which is such a versatile brush for mark marking depending on whether you use the tip or the side. In the first couple of images I drew into the paintings with a dip pen, but decided this wasn’t necessary for the other three. I painted on beige multi-media paper, actually size A5.
I loved painting these, found myself freeing up as I went through the series, and becoming gradually more relaxed about how to depict the foliage, which I was struggling with at the beginning (hence the pen).
I decided to paint the same images in watercolour on postcard-size HP watercolour paper, using a size 6 round and a rigger.
I chose a limited palette: warm sepia, ultramarine and quinacridone gold.
It’s been quite a while since I used my tube watercolours, probably not since I started the course – but I found myself at least a bit better at reserving my white areas.
The first two feel a bit insipid, I prefer the last three, and I realise that’s because I remembered to get dashes of only slightly diluted quinacridone gold in each, which just lifts the image, being reddish-orange. I have painted the first two in more muted colours without adding my touch of zing!
Also my greens were either yellow-y or blue-y, I struggled to get that bright leaf green which would also have lifted the images a little.
NOW WHAT?
I reminded myself of the enjoyment I get from drawing and painting with ink
I have proved to myself the value of having just a touch of a bright, intense colour in a painting of fairly muted colours.
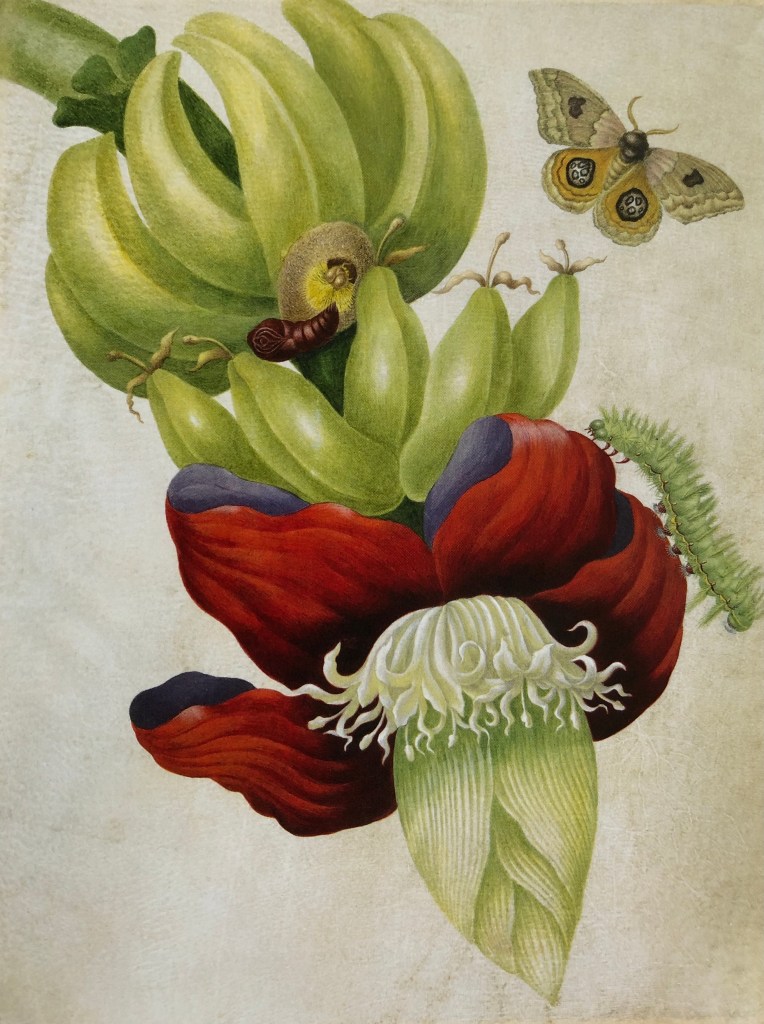
Maria was a German artist who lived 1647-1717. She was born into a family of printers and artists. She became fascinated with the portrayal of insect transformations, eventually travelling to Surinam with the younger of her two daughters. Here she painted plants and the insects associated with them, being the first to document this relationship. She worked on vellum in watercolour and gouache for each of her images. Here is an example of her painting:
“Banana Plant with Red and Purple Flower & Fruit”
1701-5
Watercolour and body colour with pen and grey ink on vellum
38.3 x 29.7 cm
British Museum, London
I wanted to have a go at working in her style, first by copying part of this image, then painting from a photograph of flowers in my garden.
SO WHAT?
I worked in my sketchbook on 150gsm cream cartridge paper, using Kuretake pan watercolours, to copy the lower part of the flower:
Next I wanted to paint from this photograph of tulips in Maria’s style, this time using Cobra water-mixable oils.
Having attended a recent Painting Dept Studio Group session where my tutor, who was leading the session, talked about her own use of dilute oils in the manner of watercolours, I was keen to give this a go.
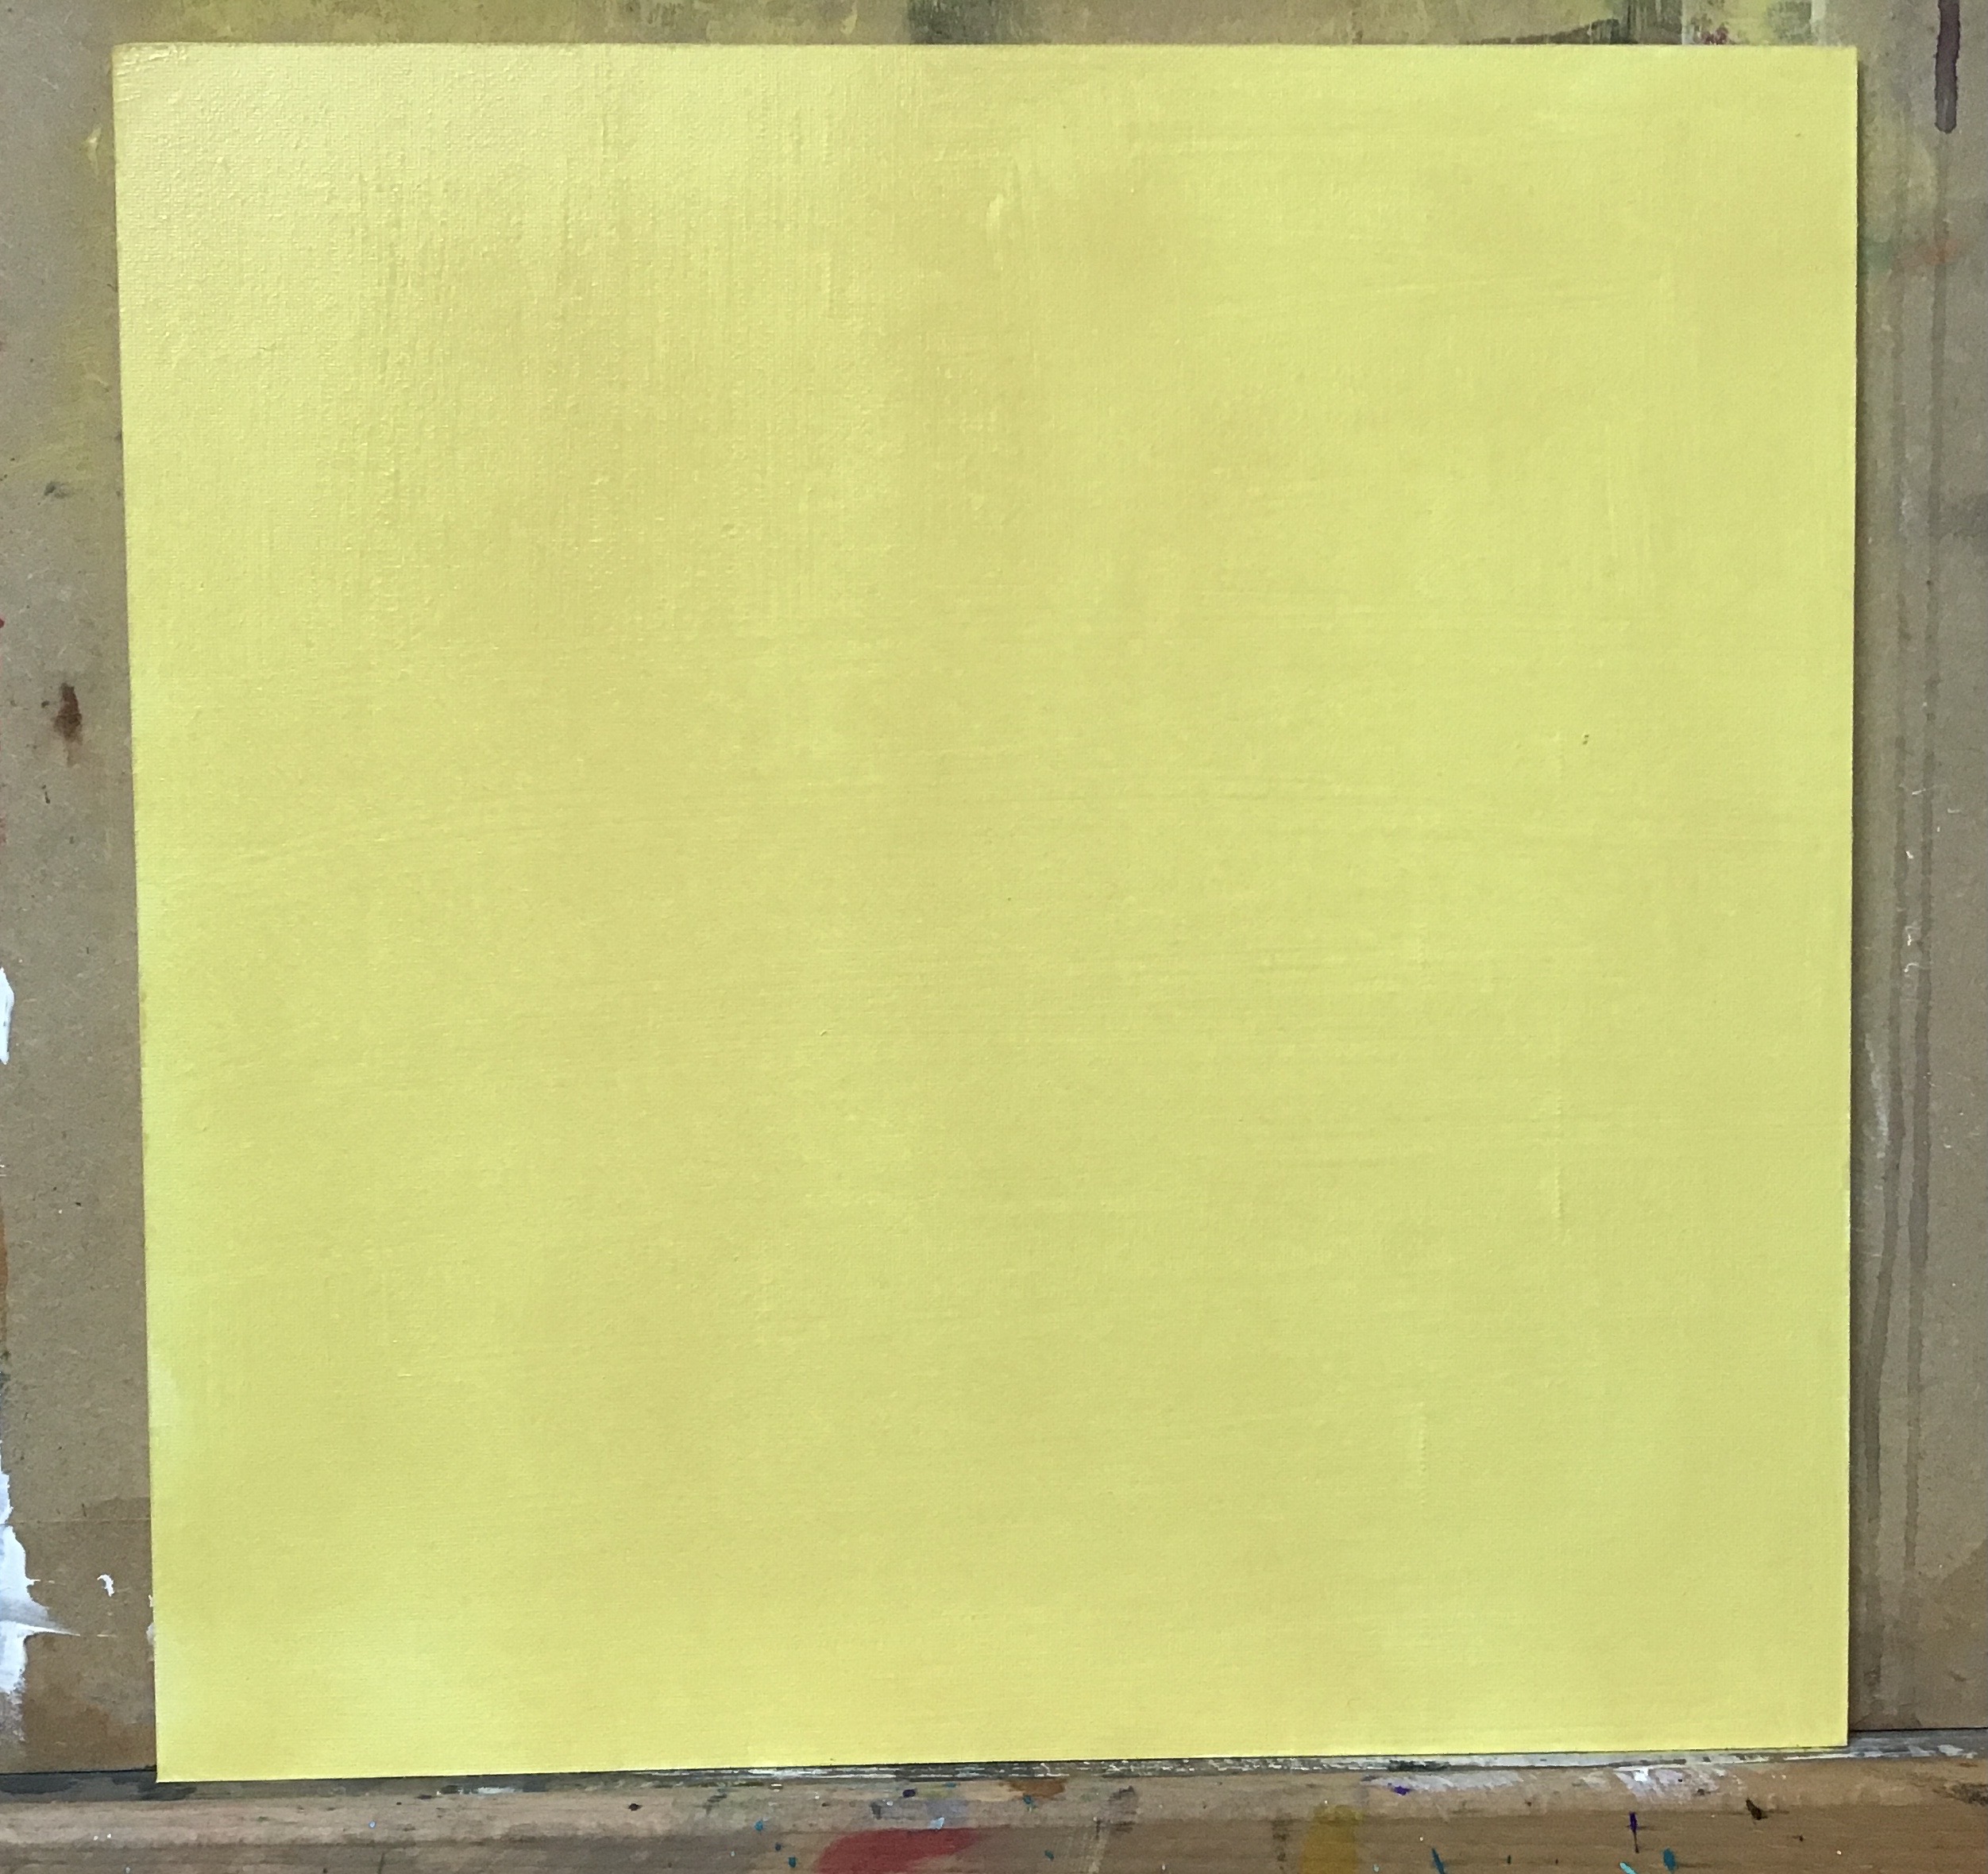
I also wanted to use a limited palette, so my initial selection was titanium white, cobalt blue, lemon yellow and Indian yellow. I began working on a primed board with the two yellows; the Indian yellow is transparent and the lemon yellow semi-transparent, so I thought they would be good for building up layers.
As the layers developed, I decided to change my plan and make the entire painting in the yellows, leaving out the blue and white. This was inspired by two pieces of research:
I had watched a video mentioned in the Technician’s Workshop section of the Painting Dept webpages: www.drawmixpaint.com. I had intended to bring out the lightest highlights using white, but the video suggested that yellow was an alternative, so I decided to use fairly concentrated lemon yellow for this purpose.
I had attended a Zoom meeting, again from the Painting Dept, which was a “Film Club” session where we watched a video showing John Hoyland talking about his painting practice; he said (I paraphrase) that he basically paints in order to learn how to do it. I took this as inspiration to play around with my painting and experiment.
I photographed the painting as it developed, from the initial layer through to the finished product:
Here is the final version:
NOW WHAT?
I have learned:
That I should take John Hoyland’s advice and experiment more
I enjoyed working in this method of building up dilute layers and should like to do this more
Paying attention to the details of the paint characteristics on the tube paid off – the two yellows were transparent either wholly or partly, whereas the white was opaque and I think would have killed the luminescence of the painting stone dead – I probably should have tried it just to prove it to myself, but I’m afraid I was too attached to the final image.
The board I had picked out of the pile to use was not ideal as the surface was textured and quite dominant – I think the final image turned out to be strong enough to get away with it, but it has been a lesson to me to think more carefully about this aspect in future.
I looked at Mimei Thompson’s work earlier in this course and was attracted to it; in the example given in the course materials, Weeds, there is something about her contrasts of streaky background colours and bold colours for the main focus of the painting which I wanted to try and emulate for the subject matter I have chosen.
SO WHAT?
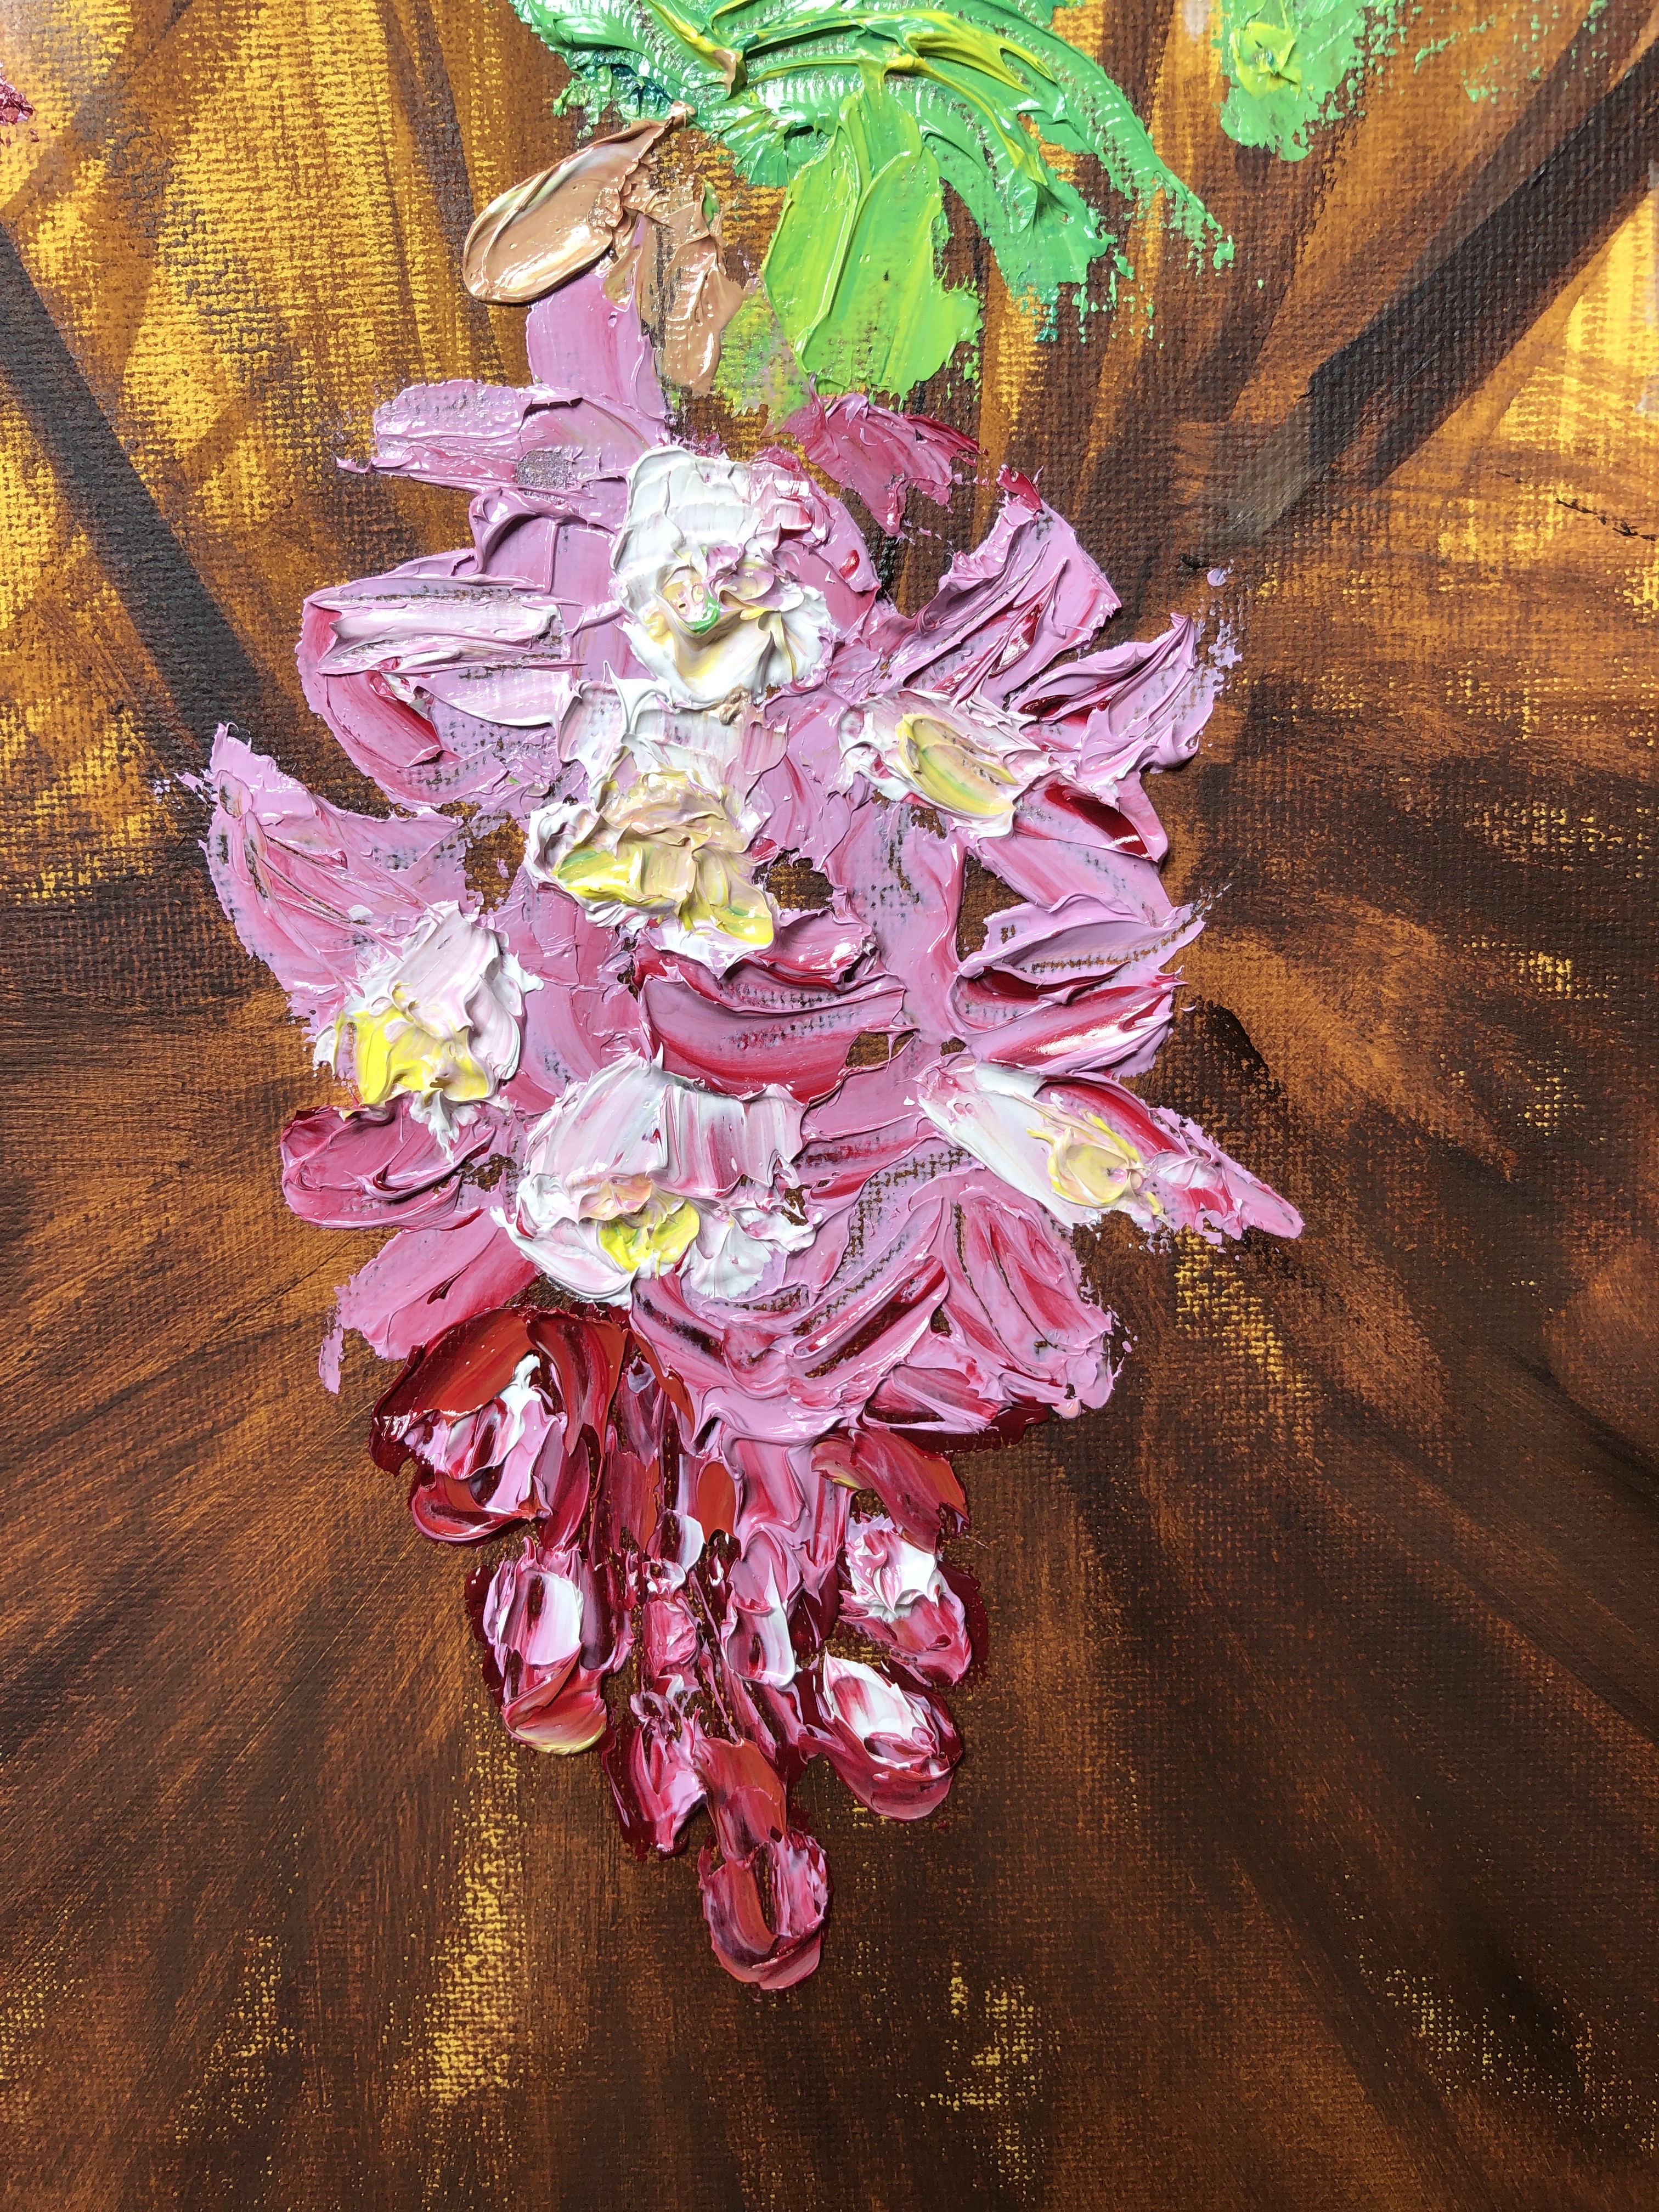
My husband has recently been in hospital for 9 weeks; he’s a great gardener, so I would regularly take photos of our garden to send him. I have chosen one of these to have a go at; a pink flowering currant. I selected this one because I wanted the challenge of setting a focused central image against a blurry background.
I have decided to look at water-mixable oil paint applied alla prima for this part of the course, for two reasons:
I have been wanting to investigate it for some time
It is a medium which I can “drop” at a moment’s notice and return to some time later, which is a useful feature in my life at the moment
I am using Cobra water-mixable oils; Talens do a helpful series of introductory videos for this paint on YouTube, which I have watched right through – I’ve found out about the exact function of gesso, why it’s important to prime paper, the importance of reading all the little symbols and notes on a paint tube, and which paints to choose to mix a particular colour.
For this painting I worked on a square canvas board, 30×30 cm; the photo was rectangular, but I cropped it to square. I haven’t copied it exactly as I wanted to try out Mimei’s style; her plants in the picture mentioned above are not exactly realistic, but they are recognisable.
There are frequently some directional lines in her backgrounds, and for my painting I felt they needed to fan out from the centre. I began with burnt umber and white over my prepared background, which was a chalky yellow house paint from the Annie Sloan range. I chose a mellow yellow to make a warm background, as if the sun was shining from behind the bush, and also because the leaves of the plant are a yellow green. The yellow is actually much more egg-yolks than it appears in this photo! This background surface accepted my brown and white paint well, and I stroked these on, very diluted, with a short flat brush, building up the darkness of the brown in the lower half, particularly on the right.
Next I experimented with my green mix. I chose lemon yellow mixed with a small amount of phthalo turquoise blue – the result was highly chromatic, and I had to tone it down with the addition of white and then more lemon yellow. Still not right – but at least I’ve learned what a strong colour the turquoise is.
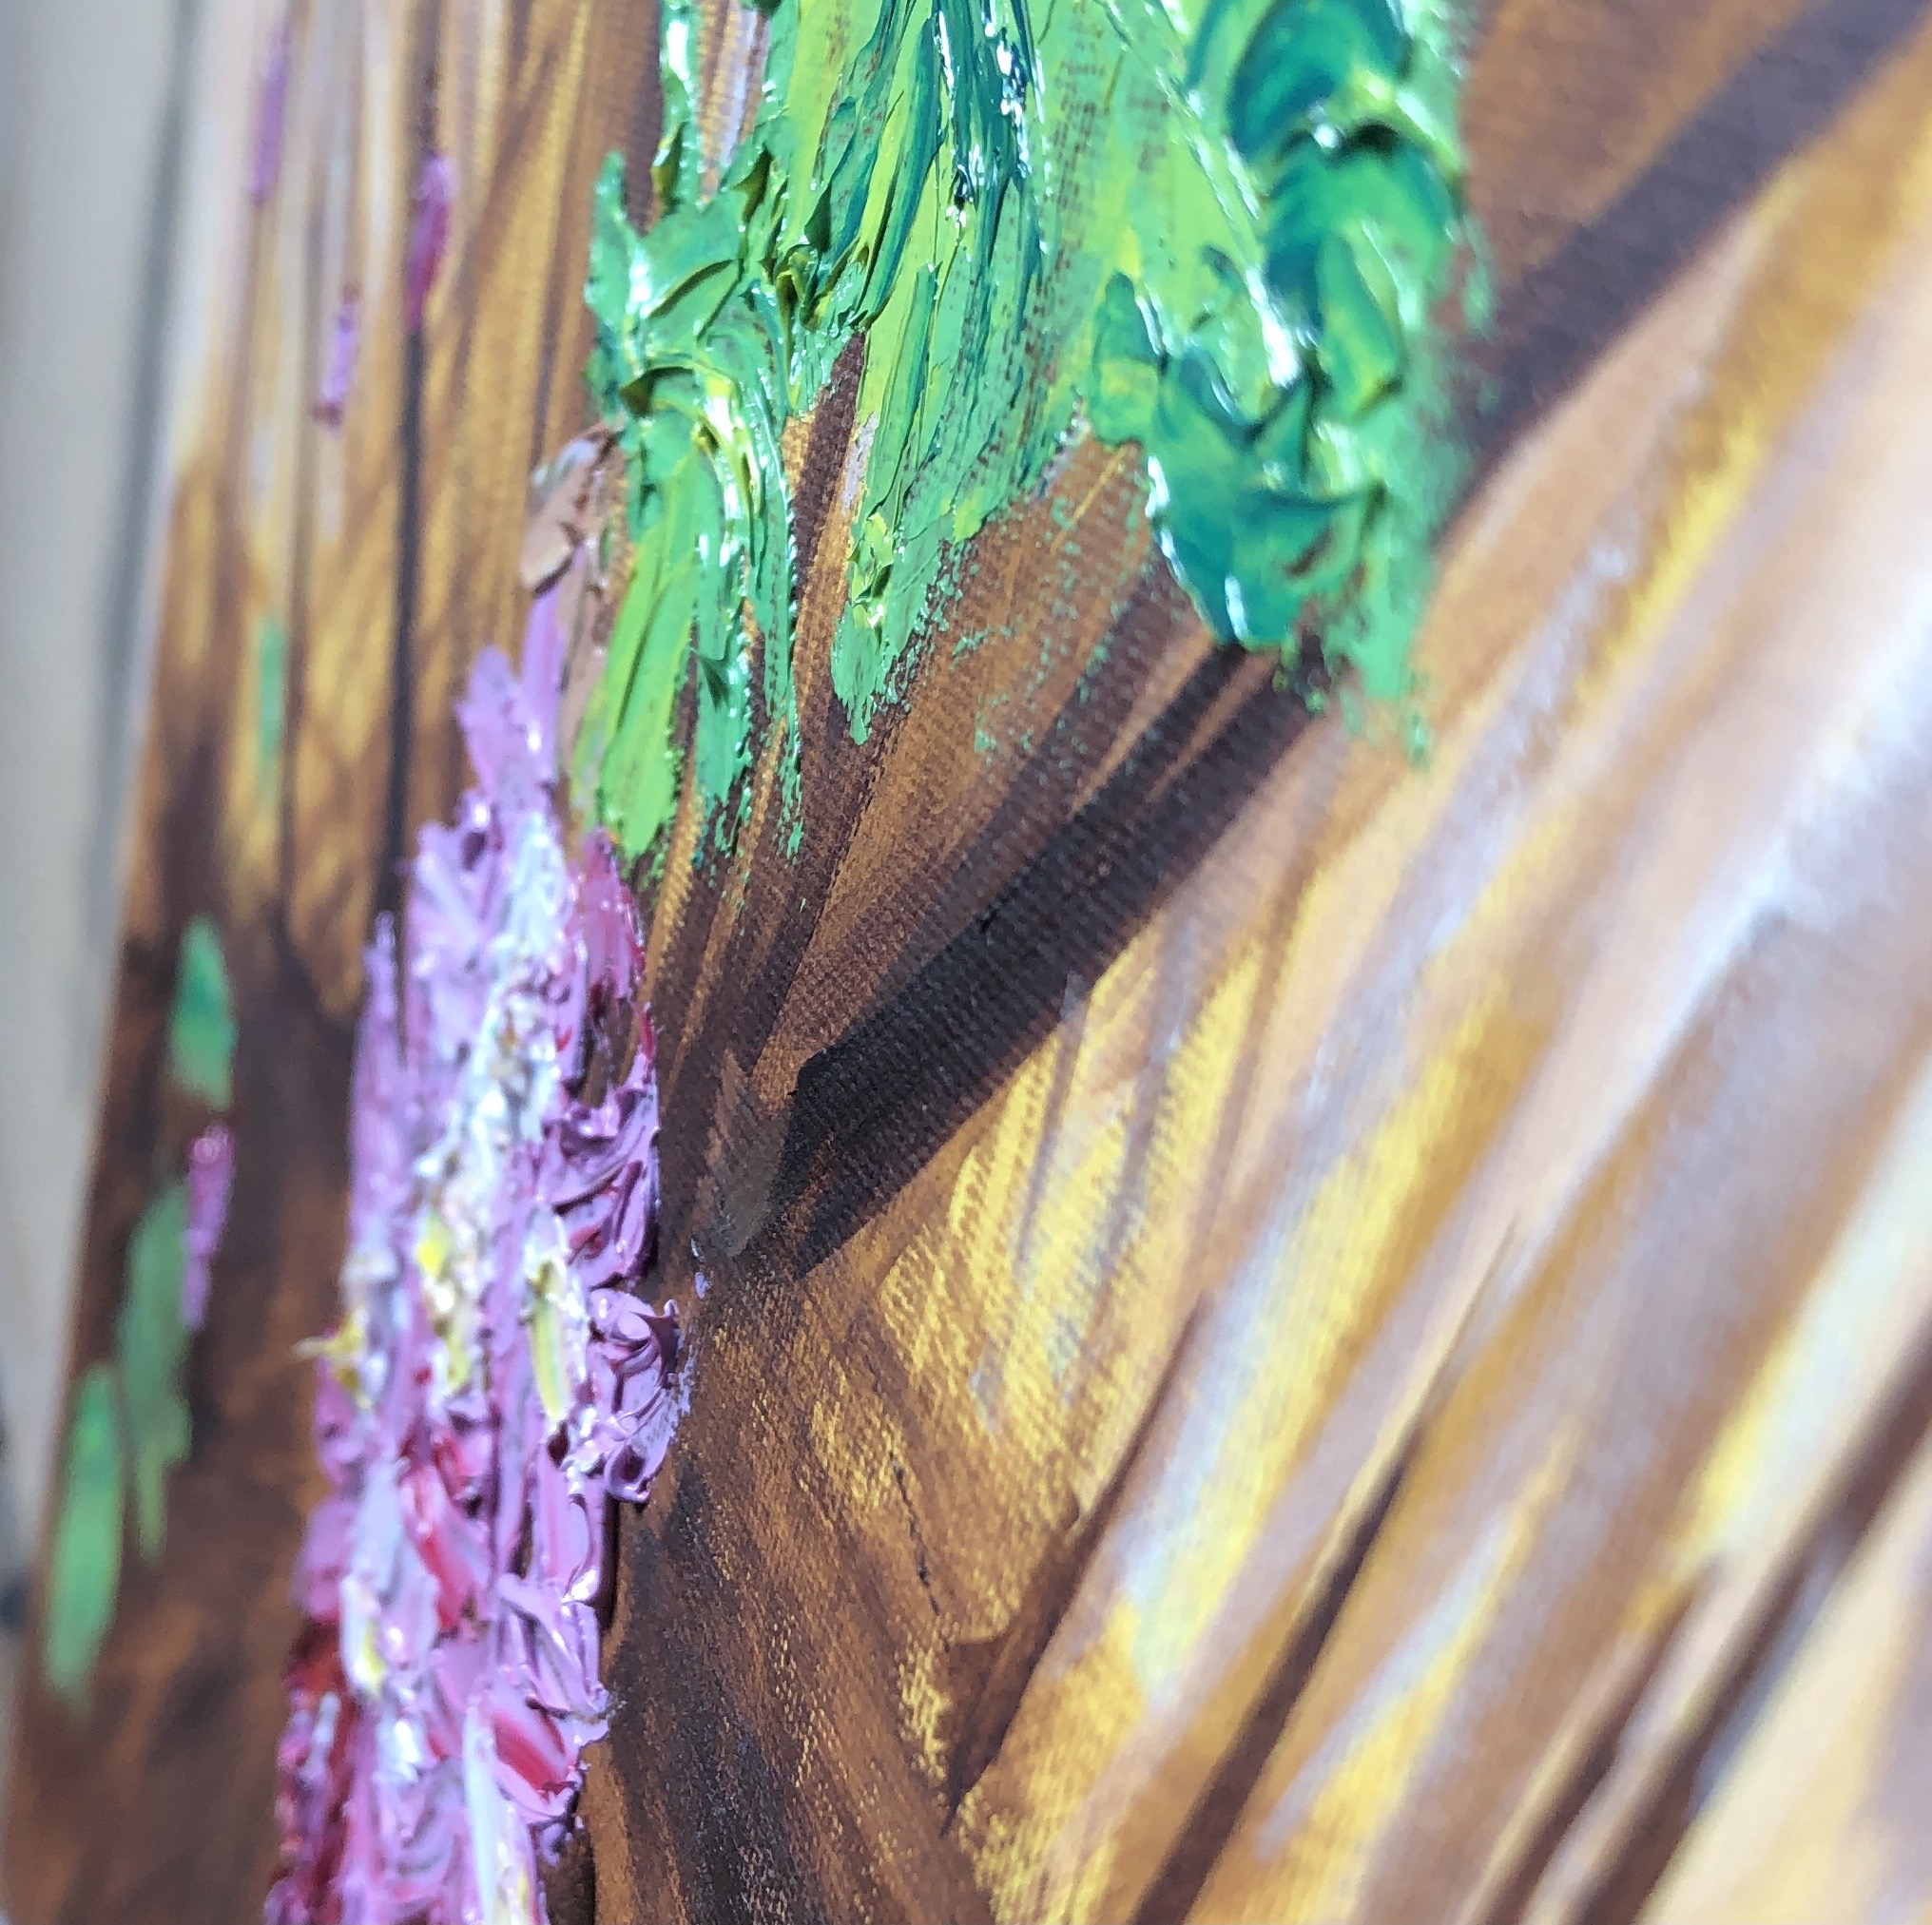
My pinks were from the tube – madder lake and Persian rose – tempered with a little white where needed and a dash of lemon yellow. I wanted the main flowers to stand out, so applied them thickly with a palette knife.
As always, I got carried away, the paint is really thick – “fat over lean” with a vengeance.
NOW WHAT?
Not my finest outcome, and nothing like Mimei Thompson; I suspect she works in layers.
The green is garish and I lost interest a bit in the background so it all looks very sparse. However, I’m pleased I did it because:
It has made me pick up the oil paints – I’ve had a bit of a block, struggling to get down to these exercises, and decided the only way to get past it was to run at something, which I did.
It has demonstrated the need for/value of colour cards (see blog post on advice from Anna and Fiona).
It has highlighted a need to do a lot more research into the alla prima method of working.
I looked at Tim Stoner’s recent work on his website, www.timstoner.co.uk. I was particularly interested to look at his use of colour in the landscape, as ostensibly his work seems bright and colourful.
SO WHAT?
I chose to look at and compare a pair of paintings of Ronda in Spain, which is where the artist lives. The view in the two paintings seems virtually the same, and centred around one tree and its background, but the appearance of the two is very different. I am no expert on Spanish climate, but I imagined that this painting was of the tree in spring when it was covered in bright blossom:
Ronda
2017-18
Oil on canvas
48 x 60 cm
….whereas this one was done in the hot, dry summer when the blossom was over and perhaps the foliage was wilting a bit:
Ronda
2017-18
Oil on paper
48 x 60 cm
Working in my sketchbook, I roughed out the images side-by-side in 2B pencil to get the feel of the composition. Then I painted it using a small set of Koh-i-Noor watercolour pans. It proved almost impossible to match the colours exactly as the paints in this set are very bright, but trying to get an approximation was good for making me look.
The first painting was based around primary colours plus green and purple. The artist seems to use a lot of white, so the intensity of most of the colours are knocked back somewhat, leaving the bright yellow of the blossom, which I think is the pure colour, to stand out, especially against the darkened red and lightened blue. The darkest tones are bottom and left; the lighter tones upper and right.
The second painting is tonally quite different; the tones are much more even around the centre, with dark tones for the mountains and the left-hand buildings in shadow. The colours are generally based around pinks, oranges and blues, and are pastel-ish. There are pairs of complementary colours (orange/blue, red/green), but none of the colours is pure, so the contrasts are not so striking.
NOW WHAT?
In the context of this Part of UPM, it was interesting to see how this artist had approached the depiction of a part of his environment and achieved very different effects depending on light and conditions.
The artist has used warmer colours in the foreground and cooler colours in the background (a generalisation) to help establish depth; this is especially noticeable to me in the second painting where the tones (apart from the strong darks) are quite similar – I need to remember this as a tool.
I chose to look at Sickert as I had a sense that enjoyed his paintings, but without knowing too much detail about him. I started off by watching a really interesting TV programme which I found on BOB called “Sickert vs Sargent”
(https://www.bbc.co.uk/iplayer/episode/p025lrcy/arena-six-days-in-september); this brought out a side of Sickert, his interest in the music hall, of which I hadn’t been aware; but more interestingly, it showed the interior of a house in which he painted many of his atmospheric paintings of people, mainly women, in/on/around beds.
I also treated myself to a book of his paintings: Baron, W and Shone, R (eds)(1992), Sickert Paintings, Royal Academy of Arts, London; Van Gogh Museum, Amsterdam; Yale University Press, London & New Haven.
SO WHAT?
I chose a painting of an interior to work from:
The Blue Hat
C. 1912-13
50.7 x 40.6 cm
Manchester City Art Galleries
My intention was, not to copy the picture as such, but to study the colours of the setting. Sickert seemed very fond of what I think of as “background” colours – sludgy greens, browns, ochres, purples – and I wanted to see if I could mix them.
I started with a palette of titanium white, burnt umber, pyrrole red, cobalt blue and lemon yellow. I found I could mix a near approximation to the sludgy green and the violet-y purple, but couldn’t get near the ochre-y colour – my lemon yellow was just too chromatic.
I adjusted my palette somewhat, retaining the pyrrole red, the titanium white and the raw umber, but substituting ultramarine blue for the cobalt, and Indian yellow for the lemon. I just focused on mixing the colours, first with white, and then with each other, to try and achieve a better match to Sickert’s colours.
The result was much more successful….the ochre and the sludgy green were bang on, I could make the characteristic purple and, interestingly, I could also make the pinkish-tinged grey which he uses so much.
NOW WHAT?
I learned that:
Some colours are very hard to mix from a given red/blue/yellow choice – you can come close, but it’s hard to be exact – so experiment, get to know the starting colours you have, and think about what you will want to achieve before making choices.
The dominance of colours, ie the amount you need to use, is also something to get to grips with before setting off; for example, in my second palette above, the ultramarine dominated the pyrrole red, which in turn dominated the Indian yellow.
The addition of white seems to almost “subtract” from a colour.
Sickert had a characteristic set of mixed colours which he used over and over, particularly for his interiors, although they appear in his music hall pictures too; they are “understated” colours, colours which one’s eye initially passes over, but this means that when he does put a pure colour in (such as the blue of the hat) it really jumps out.
I looked at Henny Acloque’s paintings on her website, www.hennyacloque.com. The thing which struck me about her work is the juxtaposition of brightly coloured figures, sometimes cartoon-ish, against sombre backgrounds, often “classical” background landscapes – Durer came to mind. I read an extract from a catalogue of her work compiled by the Contemporary Art Society (www.contemporaryartsociety.org) which described her use of “meticulously layered pigment and varnish”, and I decided to see if I could achieve anything similar in terms of vibrancy of colour within this exercise.
SO WHAT?
I began working on a piece of brown packing card using egg tempera, and created a very rough image for the purposes of experimentation, derived from this original photograph:
I left the paint to dry for about 3 hours; running my fingers over it, it felt perfectly dry to me. I ruled the painting into three sections – the first I was going to keep unvarnished for comparison, the second I was going to varnish, and the third I was going to varnish, then paint onto, and then varnish again.
This turned out to be a bit of a disaster – as soon as I started to apply the acrylic varnish with a brush, it dragged streaks of the paint with it – as can be seen by the middle section, here. I left the varnish to dry, then painted into the right-hand third section again, to try and increase the intensity of the colour. This time I left the paint to dry overnight before varnishing this third section – but it still picked up streaks of the colour and moved it around – see the close-up photo below:
An interesting experiment – the colour is definitely more luminous (as one would probably expect by adding another coat), and the way the varnish has picked it up and drifted it around has made it quite ethereal and shimmery, as something would look in bright sunlight – but clearly nothing like the effects Henny achieves.
I decided to try again – this time just a straightforward design in primary colours and white on the same board, again using egg tempera. This time I left the first coat to dry for 72 hours before adding any varnish. It seemed to have dried and the varnish was easy to apply, although still with a small amount of paint drag. Because of the design which I had made without thinking it through, I now changed my arrangement – so:
Left section= just paint
Right section = paint and varnish
Mid section = paint, varnish, paint, varnish
Here is a “before and after”:
I left the second layer of paint in the mid-section to dry for 96 hours – but as soon as I began to apply the varnish, it began to drag the paint all over the place. Obviously, the first paint layer must have partly soaked into the packing card, which helped it appear to be dry, whereas the second layer, sitting on the first coat of varnish, had nowhere to go and would need longer than 96 hours to dry properly.
NOW WHAT?
I have learned that:
if you are going to use varnish, you need patience
On reflection, I wonder if it is a property of the egg acting as binder for the pigment – is it that it doesn’t hold the pigment as strongly as some component of the varnish? Seems unlikely though, as Old Master egg tempera paintings have lasted centuries – I do think I’ve just not left the paint surface for long enough before applying the varnish
Which would then imply that using this technique (layers of paint and varnish) to obtain jewel-like colours would mean that a painting might take weeks, or months, to complete. Hmmm.